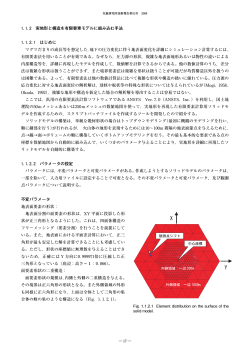
®
ABG II Cementless
Surgical Technique
Efficacy
Innovation
Introduction
This surgical technique has been
produced to help surgeons perform a
total hip replacement with an ABG®II
implant using a standard approach.
Great progress has been made in terms
of implants and materials during the
last few decades and MIS techniques
aimed at soft tissue preservation are
currently undergoing scientific scrutiny.
The aim of these techniques is to
reduce post operative pain, facilitate
functional rehabilitation and accelerate
the functional restoration of patients
undergoing this type of procedure.
It should therefore, be considered
prudent when performing MIS
techniques to refer to this surgical
technique which describes in more
detail the characteristics of a standard
approach using ABGII implants.
1
®
ABG II
Pre-operative planning
Use of templates
Pre-operative planning is essential and
should be conducted using templates
which are placed on a frontal
radiograph of the femur and then
checked against the enlargement value
noted on the template.
Templates are available with a magnification of 10% 15% and 20%.
The enlargement of the femur depends
on the focal distance, which is constant
and the object-plate distance which is
variable.
To calculate the level of magnification a
small centimetre ruler is placed in the
plane of the greater trochanter. This
ruler can then be used to determine the
enlargement of the femur shown on the
radiograph (Fig. 1).
The choice of implant is made
according to 3 reference points (Fig. 2):
1 At the diaphyseal level, the stem of
the implant drawn on the template
must merge with the shaft of the
femoral diaphysis, the prothesis
being centred to avoid either varus
or valgus positioning.
Implant sizing is determined during
templating (Fig. 3). The chosen
implant should fill the metaphysis
whilst preserving the femoral calcar
(Fig. 4).
2 Height is determined by the digital
point (D) indicated on the template.
The shoulder of the implant must be
level with the lower part of the
digital fossa (d).
3 The inferior-external or trochantericdiaphyseal point (E). The lower,
external part of the prosthesis must
come to lean against the inferoexternal part of the greater
trochanter (e) marked on the
radiograph, ensuring a minimal
3mm thickness of cancellous bone.
Precise pre-operative planning is
performed using templates.
d
e
t
t
d
st
c
e
st
Fig. 1 Measuring radiograph
of the femur with ruler.
2
Fig. 2 Radiograph
with markers.
®
ABG II
Pre-operative planning
Requirements to be checked
Several requirements must be checked:
• Filling of the metaphysis should
be optimised. When presented
with the option of choosing 2
implants it is suggested that the
smaller one be used since this
will allow for greater
preservation of cancellous bone.
This is dependent on intraoperative stability (particularly
rotatory) of the broach.
• Head centre (T) shown on the
template should be situated on a
line perpendicular to the axis of
the femur and the tip of the
greater trochanter (plus or
minus heads can then be used to
achieve leg length).
Adjustment of femoral neck
osteotomy
The cervical point (C) can be found on
the template and the line of the femoral
neck osteotomy (cervical osteotomy)
drawn by linking the digital point (D)
to the cervical point (C). This makes an
angle of approximatly 60° with the axis
of the diaphysis.
The vertical osteotomy line is then
drawn parallel to the axis of the
femoral diaphysis and begins at the
trochanteric fossa moving towards the
tip of the greater trochanter.
• There must not be any contact
at the diasphyseal level between
the stem and the cortex of the
femur. The template can be used
to indicate the minimum
drilling diameter to be
performed pre-operatively.
The pre-operative template should
then be taken as an indication of the
implant to be used. However, this may
change based upon stability of the
broaches and trial heads.
In addition, certain measurements
which can be made on the template will
be useful pre-operatively:
1. For the femur:
• The osteotomy level: Having
located the most prominent part
of the lesser trochanter (st)
using the graduation of the
template, the exact distance
between the osteotomy level and
the lesser trochanter (distance
C-st) or between the tip of the
femoral head and the osteotomy
can be measured.
• Positioning of the implant: In
order to avoid varus or valgus
positioning it is often useful to
measure the exact distance
between the internal edge of the
implant and the internal edge of
the calcar on the template. This
can then be transferred preoperatively with the enlarged
ruler of the template.
2. For the acetabulum:
T
T
D
t
Dd
C
C
E
c
e
E
st
Fig. 3 Cementless ABGII
Stem template.
Fig. 4 ABGII Template
superimposed on the radiograph.
• Templates are available to
determine the correct size and
positioning of the acetabular
cup as well as the centre of
rotation of the hip.
• As there is no spatial reference
for a patient in the lateral
decubitus position it is
necessary to mark correctly the
distance and position of the
upper edge of the cup on the
template and the upper edge of
the acetabular roof to ensure
correct orientation of the cup.
Templating is also useful to determine
both offset and anticipated leg length.
3
®
ABG II
Approaches
All approaches may be used for the
implantation of the ABG® prosthesis.
Postero-lateral
approach
Antero-lateral
approach
Patient positioning
Skin incision
Skin incision
The patient is positioned in the lateral
decubitus position and the pelvis is
then fixed in strict profile using a pubic
and buttock support. It is important to
ensure that the hip being operated
upon is free to move in flexion,
adduction and rotation whilst also
ensuring the brachial plexus is
protected.
The incision is centred on the tip of the
greater trochanter, longitudinal for
6cm (at the level of the femoral
diaphysis) and slightly oblique above
and behind in the direction of the
posterosuperior iliac spine, also for
6cm.
The incision is made vertically, about
15cm long and centred on the tip of the
trochanter.
Approach to the joint
After incision of the fascia lata, dissect
the gluteus maximus muscle in the axis
of its fibres before placing an
orthostatic retractor.
The pelvi-trochanteric muscles are
severed level with the posterior face of
the neck of the femur as is the
aponeurotic expansion of the gluteus
maximus. Conversely it is extremely
important to keep the posterior fascia
of the gluteus medius which is retained
by a retractor. The articular capsule is
then incised.
Dislocation of the hip
By using flexion, adduction and
internal rotation, the head and neck of
the femur are then exposed and a
lipped retractor is placed under the
neck of the femur.
4
Approach to the joint
The gluteus medius and the gluteus
minimus are severed 1cm from their
distal insertion point on the greater
trochanter. The gluteus medius is then
separated at the top by 2 to 3cm and the
articular capsule incised.
Dislocation of the hip
The hip is dislocated forwards by
flexion, external rotation and
adduction to expose the femoral head
and neck.
®
ABG II
Femoral neck osteotomy
Postero-lateral
approach
Antero-laternal
approach
The trochanteric fossa is identified and
an oblique line of 60° in relation to the
axis of the femoral diaphysis can then
be traced on the neck (Figs. 5 & 6).
As the trochanteric fossa is not visible,
the only reliable marker is the lesser
trochanter. Transfer the “C-st’’ distance
(between the middle of the lesser
trochanter and the level of the neck
osteotomy) from the pre-operative
overlay onto the femur.
The osteotomy can then be performed
in two cutting planes using a Stryker
oscillating saw:
• The first plane corresponds to the
oblique line from the posterior
face of the neck without it being
necessary to provide any
anteversion to the cut.
• The second plane is then made
vertically and parallel to the
internal face of the greater
trochanter, running from the
trochanteric fossa upwards.
The neck osteotomy is then performed
with a Stryker oscillating saw following
an angle of 60° in relation to the axis of
the femoral diaphysis. It is extended
outwards to the cervico-trochanteric
junction, taking care that the saw does
not penetrate the greater trochanter.
The vertical osteotomy can now be
performed.
Removal of the femoral head
The femoral head is grasped with claw forceps (and the use of a gouge chisel) at the
level of the trochanteric fossa to complete the osteotomy.
The femoral head and neck can then be removed by freeing the capsule below and
in front of the neck. It can be kept in a dish of normal saline solution in the event
that any bone grafting be required during the procedure.
60°
30°
Fig. 5 Femoral Neck Osteotomy.
Fig. 6 Orientation of the
osteotomy lines.
5
®
ABG II
Insertion of the ABGII trial cup
Exposure of the acetabulum
Insertion of the cup requires excellent
exposure of the bony acetabulum. After
practicing an "economic" capsulotomy,
the anterior and posterior horns are
ablated (Figs. 7 & 8).
The labrum is excised as well as the
transverse ligament of the acetabulum.
Any possible osteophytes of the rear
fundus are removed. Preliminary
hollowing with a gouge chisel makes it
possible to find the rear fundus and the
upper edge of the obturator foramen in
order to open up the areas of bone
sclerosis.
The smallest reamer is used vertically to
perfect this first hollowing (Fig. 9).
Fig. 7
Preparation of the acetabulum and hemispherical reaming until the exact size of the final implant is reached.
45°
Fig. 8
6
Fig. 9
Fig. 10
Fig. 11
®
ABG II
Insertion of the trial cup
Reaming
Insertion of the ABG®II trial cup
Reaming of the acetabulum is
performed seeking a subchondral
implantation of the cup which is by far
the most preferable for good biological
fixation.
The trial cup with a diameter identical
to that of the last reamer (line to line) is
introduced into the acetabulum by
impaction following the same
anteversion and inclination as that of
the reamer (Fig. 12).
The bony acetabulum is prepared using
reamers the sizing of which increases in
2mm increments. It is suggested that an
inclination of between 40-45 degrees
and an anteversion of 15 degrees
approximately should be achieved.
Reaming should continue until good
bleeding subchondral bone has been
obtained and the trial cup is stable and
sufficiently covered by acetabular bone.
During the use of the last reamer it is
recommended that excessive rotational
movements are not made, so as not to
produce an oversized or oval shaped
cavity (Figs. 10 & 11).
This trial cup should be stable within
the acetabulum and the holes make it
possible to check if good contact with
the bone has been obtained. If both of
these points are satisfactory an
acetabular shell of corresponding size
should be chosen.
Instability may sometimes be due to
insufficient reaming. To address this
issue use a reamer 2 to 4mm smaller
than the size of the trial cup and
recheck stability.
Once stability has been achieved the
trial cup can then be removed.
If required, any subchondral lesions
can be opened, curetted and filled with
cancellous bone taken from the
remains of the femoral head.
If the trial cup is unstable it is necessary
to ensure that no soft or capsular tissue
is overlapping the edge of the
acetabulum making impaction of the
trial cup difficult.
Fig. 12 Insertion of the trial cup in order to check stability, and
determine correct sizing of the acetabular component.
7
®
ABG II
Insertion of the ABGII no-hole cup
The ABG®II cup is available in 2
options: holed and no-holed.
The ABGII ceramic-ceramic (alumina)
cup comes in 3 versions. These are: Nohole / solid back cup, 3 hole cup – for
46mm, 48mm and 50mm cups and
5 hole cup – for 52mm and above.
The ABG®II no-hole / Solid back
cup
For primary surgery.
Fixing the spikes
After opening the internal packaging,
the cup is fixed to the cup-holder
screwdriver.
Using a "spikedriver", screw 2 x 8mm
spikes into holes adjacent to the row of
holes closest to the pole. It is important
that the spikes be screwed in as firmly
as possible (Fig. 13).
Insertion of the cup
The cup is then fixed on the acetabular
impactor and the cup-holder
screwdriver removed.
The cup is impacted into the
acetabulum following an inclination of
45° and an anteversion of approximatly
15°. This is obtained by introducing the
cup in such a way that the spikes
penetrate the upper part of the
acetabulum at 11 and 1 o’clock
(Fig. 14).
The cup is then impacted until it
penetrates the bony acetabulum
correctly (the lower edge of the shell
should be flush with the upper edge of
the obturator foramen). The stability of
the cup is then checked.
It is possible to use only one spike if the
bone quality allows.
Fig. 13 Fixing the spikes.
No-hole cup.
8
Fig. 14 Insertion of the
no-hole cup.
If there is not sufficent stability, the cup
is removed to ensure that there is no
impingement of the capsule or the soft
tissue. In some cases stability can be
improved by the addition of a third
8mm spike inplaced in a triangular
formation and screwed into the most
equatorial line. The shell can then be
reimplanted and its stability checked.
The acetabular impactor is removed
and a trial insert is put in place.
®
ABG II
Insertion of the ABGII holed cup
The ABG®II holed cup
Insertion of the cup
This cup is rarely used in primary
surgery and is used mainly in revision
surgery.
The cup is impacted into the
acetabulum following an inclination of
45° and an anteversion of approximatly
15°. This is obtained by introducing the
cup in such a way that the spikes
penetrate the upper part of the
acetabulum at 11 and 1 o’clock
(Fig. 14).
Fixing the spikes
After opening the internal packaging,
the cup is fixed to the cup-holder
screwdriver (Fig. 15). Use of two spikes
(7mm or 9mm) is recommended.
Using a hexagonal screwdriver, the
spikes should be screwed to the interior
of the cup, in 2 holes adjacent to the
row of holes closest to the pole. It is
important that the spikes be screwed in
as firmly as possible.
Threaded obturators
One or several obturators may be
screwed into the unused holes. They
have been designed to reduce the risk of
particle migration into surrounding
bone.
The cup is then impacted until it
penetrates the bony acetabulum
correctly (the lower edge of the shell
should be flush with the upper edge of
the obturator foramen). The stability of
the cup is then checked, the acetabular
impactor removed and a trial liner
introduced.
If there is not sufficent stability, the cup
is removed to ensure that there is no
impingement of the capsule or the soft
tissue.
Insertion of the cancellous bone
screws
In some cases of instability, or during
revision surgery, the spikes may be
replaced by 6mm cancellous bone
screws. The drill guide and its end will
be screwed into the implantation hole
using a socket screwdriver. A mesh of
the required length is put in the drill
guide in order to drill the cancellous
bone. The drill guide is then removed.
The gauge makes it possible to measure
the length of the screw, which will be
inserted with the socket screwdriver. It
is important to makes sure that the
screw, interlocked with the prosthetic
acetabulum by means of its double
screw thread, is driven in sufficiently
and that it does not overlap its housing
in order to avoid a conflict with the
permanent insert. One or several
screws may be used.
The permanent insert is then put in
place.
The obturators must be introduced
using the hexagonal socket screwdriver
and screwed down fully.
The cup is then fixed on the acetabular
impactor and the cup-holder
screwdriver withdrawn (Fig. 17).
Fig. 15 The 5-hole cup fixed with
the cup-holder screwdriver.
Fig. 16 Fixing the spikes.
Fig. 17 Fixing the cup on
the impactor.
9
®
ABG II
Insertion of the ABGII ceramic-ceramic cup
Key points of the surgical
technique
4 Do not combine components from
different manufacturers.
• Do not use ceramic femoral
heads from other manufacturers
with Stryker ceramic inserts.
• Do not use metallic femoral
heads with Stryker ceramic
inserts.
• Do not use zirconia femoral
heads with Stryker ceramic
inserts.
• Make sure that the Stryker
ceramic femoral heads are used
with approved femoral stems.
The instructions contained in
the implant packaging must be
referred to for information
about the approval of the
product.
4 Particular points about the use of
ceramics
• The implants are sterile when
delivered and must never be
resterilised.
• All precautions must be taken to
avoid any damage including
contact with metal or any other
abrasive material.
• Never use equipment which
shows signs of damage.
• Never reuse a ceramic insert.
10
4 Main points of the actual surgical
technique
• Pre-operative planning is
necessary to determine the right
size of implant and correct
positioning of the acetabular
cup and the centre of rotation
of the hip.
• Correct assembly of the insert
and the ceramic head regarding
their respective spigots is
fundamental in preserving the
integrity of the prosthetic joint.
• Incorrect positioning of the
insert or the head may cause a
difference in the length of the
neck, separation of the
implants, or even a fracture of
the head.
• All surfaces must be clean, dry
and free from debris before
assembly.
• Any ceramic implant can only
be assembled with its surface
matted once. The matting must
be light. The stability of the
implant is controlled with the
finger. The inclination and
anteversion of the cup must be
chosen to avoid any conflict.
• Some publications indicate that
positioning the cup close to 45°
would make it possible to obtain
optimal results.1,2
• A special instrument has been
created to extract the insert if
necessary.
®
ABG II
Preparation of the femur
Metaphyseal housing
The leg is dislocated again.
Using a gouge chisel, all the residue of
the femoral neck is resected and the
metaphyseal housing of the implant is
prepared.
Chisels
8 mm
12 mm 16 mm
Stems
1, 2, 3
4, 5, 6
7, 8
Correspondence
By using the hollow chisel adapted to
the size of the implant and fixed to the
broach handle, a cylinder of cancellous
bone is removed from the metaphysis
taking care to preserve the calcar
femorale to the maximum (Fig. 18).
Fig. 18 Opening of the canal with the hollow chisel.
Depending on the side being operated,
the smallest broach, left or right, is then
introduced to find the medullary canal
(Fig. 19).
If the pre-operative planning
anticipates a possible conflict between
the prosthetic stem and the diaphyseal
cortex, it is advisable to ream further
with a diameter corresponding to the
chosen implant and shown on the
template.
The drilling guide and then the flexible
reamers are introduced starting with
the size corresponding to the diameter
of the femoral medullary canal
measured during the pre-operative
planning.
Use of broaches/trial prostheses
Broaching
After checking that they correspond to
the side being operated, the broaches
are fixed to the broach handle. They are
introduced beginning with the smallest
size up to the size chosen during pre-op
planning and favouring external
penetration in order to avoid a varus
position.
Fig. 19 A broach (size 1 or 2) is inserted to locate the medullary canal.
The broach/trial prosthesis will
determine the size of the permanent
implant if two conditions are fulfilled:
• The broach must be pushed
down to the correct level: the
shoulder of the broach must be
at the level of the trochanteric
fossa.
• The broach must be perfectly
stable in the transverse direction
(varus-valgus) and particularly
in rotation.
• It is often useful to check the
correct positioning of the
broach by measuring the
distance between the internal
edge of the broach and the
external cortex of the calcar
femorale.
11
®
ABG II
Use of broaches/ trial prostheses
If, despite correct reaming, a
broach/trial prosthesis smaller than the
size anticipated in planning is perfectly
stable in rotation (perhaps due to an
anteroposterior narrowing of the
neck), the use of a larger size must not
be attempted because of the risk of a
metaphyseal fissure or fracture.
Conversely, if the broach/trial
prosthesis is unstable, the following
solutions may be considered:
• Use of a larger broach on
condition that the reamer is put
in previously following the data
given on the template.
With the broach left in place, a trial
head of a length corresponding to the
planned length is placed onto the
spigot (Fig. 20).
The hip is reduced and the following
can be checked (Fig. 21):
• Stabilise the planned implant
with a cortico-cancellous bone
graft taken from the remains of
the resected part (Please note
however that stability of the
implant should rarely be
entrusted to bone graft).
• Leg length – this can be adjusted
using plus or minus trial heads
and of the diameter
corresponding to that of the
insert.
• Seal an ABG®II femoral stem in
Vitallium® (not compatible with
alumina heads) with cement. (If
available in your area).
• Absence of impingement.
Fig. 20
12
Reduction trial
• Stability of the hip.
Fig. 21
®
ABG II
Placement of the insert
Placement of the permanent
polyethylene insert
The hip is again dislocated and the trial
head and then the broach/trial
prosthesis are removed along with the
trial insert.
The interior of the cup is cleaned and it
should be made sure that there are no
overlapping posterior and anterosuperior osteophytes present. The
permanent insert, standard or hooded,
is placed into position and impacted
using the insert impactor.
Fig. 22 Placement of the
polyethylene insert.
Placement of a ceramic insert
The hip is dislocated again, the broach
removed, the trial insert is taken out of
the cup and the ceramic insert put in
place. It is essential that the internal
surface of the ABG®II cup is clean, dry
and free from any debris as this may
impede the correct locking of the insert
in the cup.
The insert-holder vacuum extractor is
mounted on the ABGII impactor/
orientator (Fig. 24).
Fig. 23 Placement of the
ceramic insert.
Fig. 24 Use of the insert-holder vacuum extractor.
13
®
ABG II
Ceramic-Ceramic
The ceramic insert is taken out of its
packaging using the impactor/insertholder vacuum extractor unit (Fig. 25).
It is then placed correctly in the
previously cleaned ABG®II cup
(Fig. 26).
Fig. 25
Check that the insert is correctly
positioned and is perfectly symmetrical
with the interior of the cup.
Fig. 27
If the insert is correctly positioned, it
should only require one finger to fix it
in place (Fig. 27). However, if the insert
is slightly inclined in the cup it must be
taken out to check for a possible
interposition of tissues causing this
deviation. Perfect congruence between
the insert and the implant must be
obtained.
14
Fig. 26
®
ABG II
Ceramic-Ceramic
Impaction of the ceramic insert
The impaction flange is mounted on
the ABG®II impactor/orientator, and
the insert is impacted into the ABGII
cup by applying a light tap with the
mallet in the axis of the cup (Fig. 28).
Amplitude of movement and
conflict with the prosthetic neck
At the time of the femoral implant
reduction trial, it is essential to test the
mobility of the hip throughout the
amplitude of movement, to ensure that
the prosthetic neck does not come into
contact with the edge of the cup. If
there is contact, a "click" can be clearly
heard and felt.
Fig. 28 Impaction of the insert.
Extraction of the ceramic insert
In certain cases of revision, or if there is conflict with the stem, it may be necessary
to remove the ceramic insert from the ABGII cup. The extraction flange
(4930-9-12X) is screwed onto the ABGII impactor/orientator and placed against
the titanium edge of the ABGII cup. A tap of the mallet applied to the metallic cup,
well into the axis, will make it possible to free the ceramic insert, which can then be
grasped with the insert-holder vacuum extractor (Fig. 29). Under the pressure of
the insert-holder vacuum extractor, the insert may get stuck in the cup again; a
gentle rotation of the impactor/orientator will then make it possible to release the
insert.
Fig. 29 Extraction of the insert.
15
®
ABG II
Implantation of the femoral unit
Implantation of the femoral unit
Insertion of the permanent head
V40™ Heads
Insertion of the Cementless ABG®II
stem must be performed whilst taking
care to avoid touching the
hydroyxyapatite with gloves. The distal
part of the stem is introduced manually
until the stem starts to become wedged
(generally at the last centimetre). Then
it is necessary to hammer gently and
repeatedly until the stem stops. Before
impaction it is often useful to place part
of the cylinder of cancellous bone
removed with the hollow chisel
between the calcar femorale and
internal edge of the prosthesis in order
to avoid a varus position.
It is essential to wash and then dry the
Morse taper before the insertion of the
permanent head.
The ABGII HA implant (with
hydroxyapatite coating) is only
compatible with the range of Stryker®
V40™ femoral heads. These heads have
a taper of 5°40’ with an entry diameter
of 11.3mm and are available in
Vitallium® (alloy of cobalt-chrome)
and in alumina.
Using the femoral impactor, the
prosthesis is introduced into the femur,
tapping it carefully until the shoulder
of the prosthesis is flush with the
trochanteric fossa (Fig. 30).
Using the trial heads and following trial
reduction, leg length can again be
checked (Figs. 31 & 32).
Whether it is in cobalt chrome or in
alumina, the head should never be
struck but rather pushed onto the
tapered cone.
The +8mm heads must only be used
with stems sizes 2 to 8. They are not
suitable with size 1 stems.
Table of heads
Heads in Vitallium® (CoCr) V40™
Diameter
Short necks
Standard necks
Long necks
Heads in Ceramic (Alumina) V40™
Diameter
Short necks
Standard necks
Long necks
(*For Trident acetabulum)
22.2mm
0
+3
28mm
-4
0
+4 +6 +8
32mm
-4
0
+4 +8
28mm
-2.7
0
+4
32mm
-4
0
+4
36mm*
-5
0
+5
Fig. 30 Insertion of the permanent implant.
16
®
ABG II
Reduction & post-operative period
Reduction
Post-operative period
After copious washing of the joint
cavity with normal saline solution
(avoiding solutions with acid pH), the
hip is reduced.
24 to 48 hours after the operation, the
patient can begin walking with
complete support on elbow crutches
for the first month post-operatively.
The capsulo-ligamentary plane is
closed carefully in order to reduce the
risk of post-operative dislocation. Care
should be taken to avoid shortening of
posterior capsular plane, which could
create a risk of anterior stability.
Fig. 31
Fig. 32
Fig. 33 Radiograph of an ABGII HA stem with ABGII cup
(3 months post-operatively).
17
Acetabular instrumentation for ABG®II cup
ABG®II Ceramic-Ceramic
instrumentation
4930-9-100*
28mm Alumina insertholder vacuum extractor
7
9
12
15
20
30
25
35
40
45
POINTES
VIS Ø 6
50
10
20
30
40
50
4930-9-110*
Impaction flanges for 28mm
alumina inserts
EXTRACTION FLANGES FOR ALUMINA
INSERT*
ITEM
4930-9-121
4930-9-122
4930-9-123
4930-9-124
4930-9-125
SIZE (MM)
FOR ED 46, 48, 50
FOR ED 52, 54
FOR ED 56, 58
FOR ED 60, 62
FOR ED 64, 66
* The insert-holder vacuum extractor, the
impaction flange and the extraction
flange are provided for use with the
ABGII impactor/orientator
4930-9-200
Box for ABGII ceramic-ceramic
instrumentation
The instruments in the box highlighted in
orange are specific to ceramic implants.
To be used with ABG®II cups
Pre-operative templates
ABGTP02E02
ABGII Standard PE Cup
100% Magnification
ABGTP06E02
ABGII Standard PE Cup
110% Magnification
ABGTP10E02
ABGII Standard PE Cup
115% Magnification
ABGTP14E02
ABGII Standard PE Cup
120% Magnification
ABGTP03E02
ABGII Hooded PE Cup
100% Magnification
ABGTP07E02
ABGII Hooded PE Cup
110% Magnification
ABGTP11E02
ABGII Hooded PE Cup
115% Magnification
ABGTP15E02
ABGII Hooded PE Cup
120% Magnification
ABG Acetabular reamers
Pre-operative templates
ABGTP04E01
ABGII Ceramic Cup
100% Magnification
ABGTP08E02
ABGII Ceramic Cup
110% Magnification
ABGTP012E02
ABGII Ceramic Cup
115% Magnification
ABGTP016E02
ABGII Ceramic Cup
120% Magnification
18
ITEM
48390038
48390040
48390042
48390044
48390046
48390048
48390050
48390052
48390054
48390056
OUTER
DIA ITEM
38mm
40mm
42mm
44mm
46mm
48mm
50mm
52mm
54mm
56mm
48390058
48390060
48390062
48390064
48390066
48390068
48390070
48390072
48390074
48390076
OUTER
DIA
58mm
60mm
62mm
64mm
66mm
68mm
70mm
72mm
74mm
76mm
POINTES
7
9
12
15
20
25
30
35
40
POINTES
VIS Ø 6
10
20
30
40
50
7
9
12
15
20
25
7
9
POINTES
7
9
VIS Ø 6
12 12
15 15
20 20
25 25
30 30
35 35
30
40 40
35
40
7
9
7
9
12
15
20
25
VIS
6 6VIS
VISØVIS
Ø
Ø 6Ø 6
12
10
20
15
20
30
25
40
30
35
40
30
50
35
45
40
POINTES
POINTES
POINTES
POINTES
50 50
10 10
30
20 20
30 30
50
40 40
50
50 50
50
10
For Standard Inserts ID 22.2mm
48494228
20
30
40
50
10
20
40
10
20
30
40
50
7
9
12
15
20
25
30
35
40
45
7
9
12
15
20
25
30
35
40
45
POINTES
10
20
30
40
50
7 7
9 9
12 12
20 20
25 25
30 30
35 35
40 40
45 45
15 15
POINTES
50
VIS Ø 6
50
VIS Ø 6
7
POINTES
10
20
30
40
50
For Standard Inserts ID 28mm
48494232
9
12
15
20
25
30
35
40
45
VIS Ø 6
50
10
20
30
40
50
7
9
7
9
12
10 10
15
20 20
20
30 30
25
50
40 40
30
50 50
35
40
POINTES
POINTESPOINTES
50 50
45
VIS
VISØØ6 6VIS Ø 6 VIS Ø 6
12
15
20
25
30
35
40
For Standard Inserts ID 32mm
48494322
45
POINTES
30
10
50
20
50
30
40
For Hooded Inserts ID 22.2mm
48494328
50
10
20
40
48496080
ABGII Orientator Ring
7
VIS Ø 6
10
POINTES
50
45
48494222
POINTES
VIS Ø 6
50
48496060
ABGII Cup Impactor/Orientator
9
12
20
30
40
50
45
45 45
50
7
9
12
15
20
25
30
35
45
ABGII Impactor Flanges
40
02881010
Hudson female / Jacobs male
Adaptor
15
50
10
20
30
40
50
To be used with ABG®II inserts
45
48390110
NBG Reamer Handle with AO
Connection
20
7
VIS Ø 6
50
48390100
NBG Reamer Handle with Hudson
Connection
25
30
35
40
45
9
12
15
20
25
30
35
40
45
Acetabular Instrumentation for ABG®II Cup
For Hooded Inserts ID 28mm
48494332
For Hooded Inserts ID 32mm
48491000
Cup Extractor
ABG®II Acetabular instruments storage
48496070
Cup Holder Screwdriver
48498353
ABGII Hexagonal Socket Screwdriver
1826350
Standard Hexagonal Screwdriver
48496010
"Spikedriver" for 8mm Spikes
48496200
ABGII Acetabular Instrumentation
Box (empty)
48496100
Tray for Reamers, Trial Cups, Spikes
(empty)
Tray for Reamer Handles/Cupholder Screwdriver/Cup
Impactor/Screwdriver (empty)
48492013
Standard Screw-holding Forceps
48492014
Curved Screw-holding Forceps
48493000
Double Drill Guide
48493015
Flexible Drill Diameter 3.2mm,
Active Length 15mm
48493030
Flexible Drill Diameter 3.2mm,
Active Length 30mm
48492012
Screw Depth Gauge
7
9
12
15
20
25
30
35
40
45
77
99
12
12
15
15
20
20
25
25
30
30
35
35
40
40
45
45
POINTES
VIS Ø 6
50
10
20
30
40
50
7
9
10
30
10
10
50
20
30
40
50
20
20
30
30
50
POINTES
POINTES
POINTES
POINTES
7
9
12
15
20
25
50
40
40
50
50
VIS
VIS ØØ6VIS
6 Ø
VIS
6 Ø6
12
15
20
25
30
35
40
45 50
50
30
35
40
45
48496050
ABGII Spike, Screw and Obturator
Sterilisation Case
10
20
40
19
Femoral Instrumentation for ABG®II Stems
49011600
New Posterior Approach ABGII
Broach (V40™ Spigot)
Pre-operative Templates
ABGTP01E02
ABGII Stem
100% Magnification
49011540
Anterior Approach ABGII Broach
Holder Handle (V40™ Spigot)
ABGTP05E02
ABGII Stem
110% Magnification
7300001
Hexagonal Screwdriver for ABGII
Broach Holder (Anterior)
ABGTP09E02
ABGII Stem
115% Magnification
48421000
Femoral Impactor
48422000
Reduction Guide
ABGTP13E02
ABGII Stem
120% Magnification
48498001
Plastic Modular Femoral Extractor
for V40™ Spigot
Modular Hollow Chisels for
Broach-holder Handle
ITEM
48498008
48498012
48498016
SIZE
8mm
12mm
16mm
ABG Flexible Reamers
Length 400mm
ITEM
02224006
02224008
02224010
02224012
02224014
02224016
02224018
02224020
02224022
02224024
02224026
DIAMETER
8mm
9mm
10mm
11mm
12mm
13mm
14mm
15mm
16mm
17mm
18mm
49001530
Flexible Reamer Guide ø3.2mm,
L 520mm
0252-0-010
Trinkle female/Jacobs male Adaptor
44000420
Trinkle female/AO male Adaptor
48424002
Diameter Gauge for ABGII Broaches
and Flexible Reamers
20
48498002
Metal Modular Femoral Extractor
for V40™ Spigot
ABG®II Femoral Instrumentation Storage Box
48496300
ABGII Femoral Instrumentation Box
(empty)
"Classic" Broaches
Left
4845-0-921
4845-0-922
4845-0-923
4845-0-924
4845-0-925
4845-0-926
4845-0-927
4845-0-928
Size
1
2
3
4
5
6
7
8
Length (mm)
103
103
113
118
123
128
138
148
Right
4845-0-911
4845-0-912
4845-0-913
4845-0-914
4845-0-915
4845-0-916
4845-0-917
4845-0-918
Modified "anti-varus" Broaches
Left
4845-2-921
4845-2-922
4845-2-923
4845-2-924
4845-2-925
4845-2-926
4845-2-927
4845-2-928
Size
1
2
3
4
5
6
7
8
Length (mm)
121
121
131
141
146
151
166
176
Right
4845-2-911
4845-2-912
4845-2-913
4845-2-914
4845-2-915
4845-2-916
4845-2-917
4845-2-918
References
1.
On the Material and Tribology of Alumina-Alumina Coupling for Hip Joint Prostheses A. Walter - Clinical Orthopaedics and Related Research 282 p31-46, 1992.
2.
Role of Ceramic Implants Design & Clinical Success with Total Hip Prosthetic Ceramic-toCeramic Bearings - I.C. Clarke - Clinical Orthopaedics and Related Research 282 p. 19-30,
September 1992.
This document is intended solely for the use of healthcare professionals.
The information presented in this brochure is intended to demonstrate the breadth of
Stryker product offerings. Always refer to the package insert, product label and/or user
instructions before using any Stryker product. Products may not be available in all
markets. Product availability is subject to the regulatory or medical practices that
govern individual markets. Please contact your Stryker representative if you have
questions about the availability of Stryker products in your area.
Products referenced with ™ designation are trademarks of Stryker.
Products referenced with ® designation are registered trademarks of Stryker.
Literature Number: ABGOT01E02
BEN14898/REF 1 09/05
Copyright © 2005 Stryker
Stryker SA
Cité-Centre
Grand-Rue 90
1820 Montreux
Switzerland
t : +41 21 966 12 01
f : +41 21 966 12 00
www.europe.stryker.com
http://www.abg2hip.com
© Copyright 2026 ExpyDoc