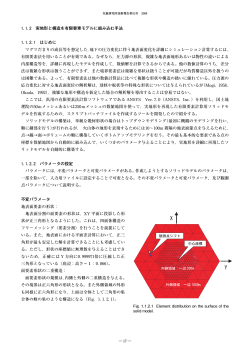
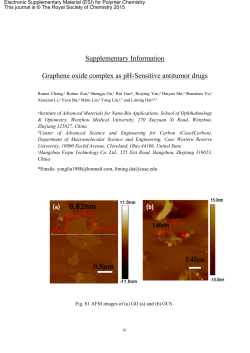
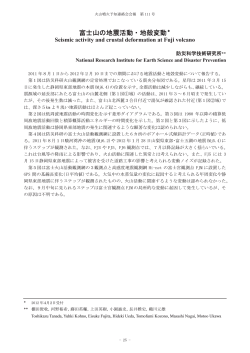
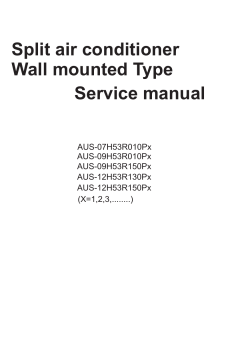
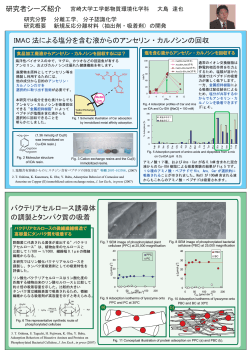
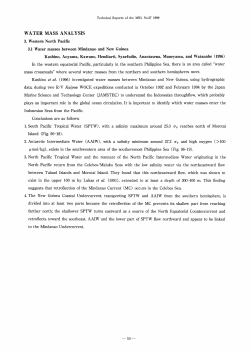
SERVICE MANUAL
Order No.
FACTORY MODEL NO.
ESA410M
CUSTOMER MODEL NO.
HWE10XCN
ON/OFF
MODE
SPEED
TIMER
TEMP/TIME
TEMP/TIME
Feature
Top Discharge Airflow Pattern
Modern Family-look Design
3 Cool Settings, 3 Fan Settings
Easy-to-install Mounting Kit
Easy-Access Washable Filter
Digital Time & Temperature Display
24 Hour on/off Timer
Filter Reset
Sheeping
WARNING
This service information is designed for experienced repair technicians only and is not designed for use by the general public.
It does not contain warnings or cautions to advise non-technical individuals of potential dangers in attempting to service a product.
Products powered by electricity should be serviced or repaired only by experienced professional technicians. Any attempt to service or
repair the product or products dealt with in this service information by anyone else could result in serious injury or death
©2014 (Qingdao Haier Air Conditioner General corp.,Ltd)
All right reserved .Unauthorized copying and distribution is a violation of law
Group
Table of Contents
Table of Contents
1. Product Code Illumination and Series introduction .................................1
2. Specifications................. ................................................................................. 2
3. Safety and Precaution......................................................................................3
4. Warning and Cautions......................................................................................4
5. Installation and Accessory Par ts...................................................................6
6. Par ts and Functions..........................................................................................13
7. Abnormity Diagnose........................... ............................................................17
8. Syst em Flow Chart..........................................................................................19
9. Circuit Diagram................................................................................................20
10. Wiring Diagram.............................................................................................. 22
Domestic Air Conditioner
HWE10XCN
10000
Specification
2.Specification
Item
Cooling capacity
Heating capacity
Power supply
Cooling
Heating
Sound Level
Net dimensions
Packaging
dimensions
Weight
Compressor
Pressure
Refrigerant
Fan
Type
Fan Speed
Air volume
Power input
Running current
EER
Power input
Running current
COP
Indoor side
Outdoor side
Height
Width
Depth
Height
Width
Depth
Net
Gross
Type
Model
Running cap. For comp.
Hi-Pressure
Low-Pressure
Model
Charge
Indoor unit
Outdoor unit
Indoor unit
Moisture removal
Unit
HWE10XCN
BTU/h
BTU/h
10000
/
1PH/115V/60HZ
920
8.5
10.8
/
/
/
54
58
14 3/8
19
18 1/8
17
21 1/4
22
25.8
29.5
Rotary
W
A
BTU/(h·W)
W
A
BTU/(h·W)
dB(A)
dB(A)
inches
inches
inches
inches
inches
inches
kg
kg
/
µF
Psig
Psig
R22 or
R410A
YZG-A086AY2D2T2
OZ
/
/
r/min
CFM
18.3
centrifugal
axial
1600/1500/1400
Pints/hr
2
55
560
240
R410A
270
3.0
Domestic Air Conditioner
Safety and Precaution
3. Safety and Precaution
WARNING:
The information in this use & care guide must be followed to minimize the risk of personal injury, fire,electric
shock or other unsafe conditions.
The instructions in this use & care guide are not meant to include every possible conditionor situation that
may occur. Use caution and care when installing, operating and cleaning the air conditioner.
1. U se this air conditioner only for its intended application as described in this Use & Care Guide.
2. This air conditioner must be properly installed and use the correct wall outlet that matches with the air conditioner’s
power supply cord in accordance with the Installation Section of this Use & Care Guide before it is operated.
3. Never unplug the air conditioner by pulling on the power supply cord.Always grip the plug firmly and pull straight
out from the wall outlet.
4. Replace the power supply cord immediately if it becomes damaged in any way. A new power supply cord must
be purchased from the air conditioner manufacturer and installed by a qualified technician. DO NOT use a power
supply cord that is cracked, split, cut, or damaged anywhere along its length or either at the plug end or connector
end.
5. Turn off the air conditioner and unplug it from the wall outlet before performing any cleaning or maintenance.
6. Do not store or use combustible or flammable materials or liquids on or near the air conditioner.
7. If the wall outlet configuration does not match the plug configuration on the air conditioner, the wall outlet must be
changed by a qualified electrician.
8. This air conditioner contains R410a refrigerant and requires certified technicians to use the proper equipment,
tools and safety standards that are approved for this refrigerant. Use only equipment certified for R410a
refrigerant. In addition, under federal law, all refrigerant must be properly removed from the air conditioner prior
to its disposal.
3
Domestic Air Conditioner
Warning and Cautions
4.Warning and Cautions
WARNING
• Electrical shock hazard
• Plug into a mating, grounded 3 prong outlet.
• Do not remove the ground prong from the power supply cord.
• Do not use a plug adapter, extension cord, surge protector, or multi-outlet adapter
• Failure to follow these instructions can result in injury, fire, or electrical shock.
ELECTRICAL REQUIREMENTS
1. DO NOT cut or remove the grounding prong on the attached power supply cord. Doing so may cause sparks or fire,
and voids all warranties. For safety purposes the air conditioner must be properly grounded.
2. To avoid a fire hazard or possible electric shock, DO NOT use an adapter plug, extension cord,surge protectors, or
multi-outlet adapters with the air conditioner.
3. The power supply cord is equipped with a 3-prong plug which mates with a standard 115 volt wall outlet to minimize
the possibility of electrical shock from this air conditioner.
4. The power supply cord includes a leakage current detection interrupter device (LCDI). A RESET and TEST button are
on the plug case. The device should be tested on a periodic basis by pressing the TEST button and then the RESET
button while it is plugged into the wall outlet. If the TEST button does not trip or the RESET will not stay engaged,
do not use the air conditioner and contact a qualified service technician.
5. Have the wall outlet and circuit inspected by a qualified electrician to ensure that the wall outlet is properly grounded.
6. If there is a 2-prong wall outlet present and not a 3-prong wall outlet, it is the responsibility of the user to have it
replaced with a properly grounded 3-prong outlet.
7. The air conditioner should always be plugged into a dedicated electrical outlet which has a voltage rating that matches
the serial label on the side of the air conditioner.
8. The electrical ratings for your air conditioner are listed on the Model/Serial Number label. The Model/Serial Number
label is located on the side of the air conditioner cabinet, or behind the front grille.
9. Specific electrical requirements are listed in the chart below. Follow the requirements for the type of plug on the
power supply cord.
Recommended grounding method
This air conditioner must be grounded. This air conditioner is equipped with a power supply cord that has a 3 prong
grounding plug. The power supply cord must be plugged into a mating, grounded 3 prong outlet, and grounded in
accordance with all local codes and ordinances. If a mating outlet is not available, it is the customer’s responsibility to
contact a qualified electrician and ensure that a properly grounded 3 prong outlet is installed.
Power supply cord
This room air conditioner is equipped with an a leakage current detection interrupter ( LCDI) power supply cord required
by UL. This power supply cord contains a current detection device. If the power supply cord is crushed, this device will
detect current leakage and power will be disconnected from the air conditioner. If this power supply cord is damaged, it
cannot be repaired and must be replaced with a cord from the product manufacturer.
4
Domestic Air Conditioner
Warning and Cautions
Energy Saving Guide
When installing your air conditioner , make sure to seal all areas where there is a possibility of air leakage .
The airflow should not be blocked , either inside by curtains , drapes or furniture , or outside by shrubs or
bushes .
Do not needlessly use electrical light or other appliances that produce heat .
Keep the blinds and drapes drawn on all other windows .
While cooking ,use an exhaust fan in the kitchen to remove the excess heat .
Always use the correct BTU size air conditioner to cool the room to attain optimum efficiency .
5
Domestic Air Conditioner
Installation and Accessory Parts
5. Installation and Accessory Parts
1. This air conditioner contains no consumer serviceable parts. If you have problems or questions regarding the
operation of your air conditioner always call Haier Customer Service: 1-877-337-3639.
2. Be sure that the air conditioner is properly and securely installed in the window according to the installation
instructions included in this Use & Care Guide.
3. DO NOT drill any holes in the base or sides of the air conditioner.
4. DO NOT place fingers or objects in the air discharge or air intake in the front of the air conditioner.
5. DO NOT operate the air conditioner with a protective cover on the outside section.
6. DO NOT block the air discharge or air intake areas on the front panel.
7. DO NOT block the side louvers on the outside of the air conditioner.
8. DO NOT place any objects either on the indoor or outdoor sections of the air conditioner
9. Operate the air conditioner with the air filter installed.
10. Keep this Use & Care Guide, carton and packing material for future use in removing, storing and reinstalling
the air conditioner.
6
Domestic Air Conditioner
Installation and Accessory Parts
Window Installation
Window opening measurements:
A. Width
B. Height
B-HEIGHT
A-WIDTH
Prepare Air Conditioner for Installation
Install Top Channel
1. Place the top channel on the top of the air conditioner, lining up the holes in the top channel with the holes in the top
of the air conditioner.Make sure the channel is facing forward as indicated by the sticker.
2. Using 3/8 " self-tapping screws, attach the top channel to the top of the air conditioner.
Use three (3) 3/8" self-tapping screws.
7
Domestic Air Conditioner
Installation and Accessory Parts
Install Side Curtains
NOTE: Attach side curtains to the air conditioner before placing the unit in the window.
1. Place the tabbed side of the side curtain in the track on the right-hand side of the air conditioner cabinet.
(See Fig.1)
Fig. 1
TABBED SIDE OF
SIDE CURTAIN
Fig. 2
LOCK EDGE SIDE
OF SIDE CURTAIN
2. Slide the tabbed side of the side curtain down over all 3 tracks until the curtain is aligned with the top and bottom
of the air conditioner cabinet. (See Fig.3)
3. Slide the side curtain frame over the top of the side curtain, then into the channel on the top of the air conditioner
and into the track on the bottom of the air conditioner. (See Fig.4)
4. Slide the side curtain frame as close to the air conditioner cabinet as necessary to lock the side curtain to the frame.
Gently press the frame until it clicks.(See Fig.2 & Fig.4)
5. Repeat above steps for the left-hand side curtain and frame. Make sure no gaps are left to ensure that air does not
escape into or out of the room.
Fig. 4
Fig. 3
CLICK
8
Domestic Air Conditioner
Installation and Accessory Parts
Prepare Window for Installation
1. Measure the width of the window opening.(See Fig.5)
2. Mark the center line on the inside of the windowsill with a pencil. (See Fig.6)
WIDTH OF
WINDOW OPENING
CENTER LINE
Fig. 5
Fig. 6
WIDTH
HEIGHT
WIDTH
CENTER
Notes and warnings:
Be sure your air conditioner does not fall out of the window opening during installation or removal.
• Do not block the air discharge or air intake areas on the front panel.
• Do not block the louvers on the outside of the air conditioner.
3. Center the air conditioner in the window sill.Make sure to place the unit so that it is resting on the windowsill with
a ¼" to ½" downward tilt towards the outside. Lower the window sash behind the top channel to hold the unit in
place.(See Fig.7)
Lower Window Sash
Top Channel
Fig. 7
Fig. 8
NOTE:
ff
4. Loosen the screw located on the lower-right hand corner of the air conditioner.
5. Slide the side bracket over the screw. The side bracket should be resting on the window sill.(See Fig.8)
6. Partially tighten the screw. Secure the unit before tightening completely.
7. Use 1/8" drill bit to drill a starter hole through the holes in the side bracket.
8. Using two (2) 1" wood screws, attach the side bracket to the window sill.
9. Repeat for side bracket installation on the left-hand side of the air conditioner.
9
Domestic Air Conditioner
Installation and Accessory Parts
Completing the installation
Attach side curtains to window
1. Pull the left-hand curtain and frame out until it fits flush to the side of the window frame. (See Fig.9)
Fig. 9
2. Use a 1/8” drill bit to drill a starter hole through the top hole in the side curtain and into the window sash.
3. Insert one (1) 1" wood screws through the top hole of the left hand curtain and into the window sash.(See Fig.10)
Fig. 10
4. Repeat for the right-hand curtain.
5. Use a 1/8" drill bit to drill a starter hole into the window sash using the top hole in the side curtain as a guide.
6. Insert one (1) of the 1" wood screws through the bottom hole of the left-hand curtain and into the window frame.
(See Fig.11)
Fig. 11
7. Repeat for the right-hand curtain.
10
Domestic Air Conditioner
Installation and Accessory Parts
Final installation
1. Uncoil the included foam seal.(See Fig.12)
Fig. 12
2. Insert the foam seal behind the top of the lower window sash and against the glass of the upper window.
3. Place the window lock bracket as shown in the diagram using a screwdriver. Use a 1/8" drill bit to drill a starter
hole through the hole in the window lock bracket and into the upper window. (See Fig.13)
4. Attach the window lock bracket to the upper window with one (1) 1" wood screw to secure the unit in place.
5. Plug unit into a grounded 3 prong outlet.
6. Press RESET on the power supply cord. A green light will come on. See “Electrical Requirements" for full detail.
Fig. 13
11
Domestic Air Conditioner
Installation and Accessory Parts
Parts
Check that all parts for your specific air conditioner are included in parts package.
Top channel
Window lock bracket
Foam seal
3/8" self tapping
screws(4)
Side bracket(2)
1" wood screws(9)
ON/OFF
MODE
SPEED
TIMER
TEMP/TIME
TEMP/TIME
Side curtains(2)
Side curtain frames(2)
Remote control
Tools
■ Phillips head screwdriver
■ Scissors
■ Level
■ Tape measure
■ Drill and 1/8” bit
■ Pencil
12
Domestic Air Conditioner
Parts and Functions
6.Parts and Functions
°F/°C
Hr
MODE
SPEED
TIMER
FAN
HIGH
ON
ENERGY
SAVE
COOL
MED
OFF
LOW
SLEEP
DEHUM
AUTO COOL
TEMP/TIME
FILTER
RESET
CLEAN FILTER
POWER
AUTO RESTART
MODE
1. Press MODE until you see the indicator light come on next to the desired setting.
2. Choose Fan, Energy Saver, Cool or Dehum.
■ Fan—Only the fan runs. Press SPEED to select High, Med or Low fan speed. The display shows the
current room temperature.
■ Energy Save—In this mode the fan runs only when cooling is needed. The fan will run for 3 minute after
the compressor shuts off. The fan then cycles on for 2 minutes at 10 minute intervals until the
temperature in the room is above the set temperature. The compressor then turns back on.
■
Cool—Cools the room. Press SPEED to select High, Med, Low or Auto Cool fan speed. Press the
TEMP/TIME up or down arrow button to adjust the temperature.
■
Dehum—Aids in removing humidity from the room. The air conditioner automatically selects the
temperature.This setting will NOT cool the room.
SPEED
1. Press FAN SPEED until you see the indicator light come on next to the desired setting.
2. Choose High, Med Low or Auto Cool.
■ High—for maximum cooling
■ Med—for normal cooling
■ Low—for minimum cooling
■ Auto Cool—Adjusts the fan speed automatically to provide ideal cooling based on the room temperature.
13
Domestic Air Conditioner
Parts and Functions
TIMER
To set the air conditioner to turn off between 1 hour and 24 hours (The air conditioner must be ON
to set):
1. Press TIMER. Timer Off indicator light will flash. The display will show the remaining hours before
the air conditioner will turn off.
2. Press the TEMP/TIME up or down arrow button to change the delay time from 1 hour to 24 hours.
3. After 5 seconds, Timer Off indicator light will remain on. The display will show the left time to
Timer Off.
To set the Timer to turn on the air conditioner, keeping the previous settings:
1. Turn on the unit.
2. Press TIMER. Timer On indicator light will flash. The display will show the remaining hours before
the air conditioner will turn on.
3. Press the TEMP/TIME up or down arrow button to change the delay time from 1 hour to 24 hours.
4. Timer On indicator light will remain on.
To clear timer program:
NOTE: Air conditioner can be either on or off.
Press TIMER until Timer indicator light turns off.
To view or change the remaining time (in hours):
TIMER OFF
1. Press the TEMP/TIME up or down arrow button to increase or decrease the time.
2. After 5 seconds, the display will show the remaining time to Timer OFF.
TIMER ON
1. Press the TEMP/TIME up or down arrow button to increase or decrease the time.
2. After 5 seconds, the display will show the remaining time to Timer ON.
14
Domestic Air Conditioner
Parts and Functions
SLEEP
1. Press the TIMER button to choose Sleep mode. The indicator light will turn on.
2. The temperature will increase by 2˚F 1 hour after the mode is chosen. The temperature then increases another
2˚F increases another 2˚F after 1 hour. The unit will hold this temperature for 8 hours then stops.
3. To turn off Sleep mode, press the TIMER button until the indicator light is off.
TEMP/TIME
1. Press the TEMP/TIME up arrow button to raise the temperature. Each time you press the TEMP/TIME up arrow
button, the temperature will go up 1°F until it reaches 86°F (30°C).
2. Press the TEMP/TIME down arrow button to lower the temperature. Each time you press the TEMP/TIME down
arrow button, the temperature will go down 1°F until it reaches 61°F (16°C).
NOTE: After 5 seconds, under Fan mode,the display will show the current temperature,Under Energy Save, Cool
or Dehum mode,the display will show the set temperature.
FILTER RESET
This feature automatically notifies you that the air filter must be cleaned. The indicator light will come on after 240
hours of operation. Clean the air filter (refer to Care and Cleaning), place it back in the front panel, and press the
Filter Reset button. The light will turn off.
USING THE REMOTE CONTROL
ON/OFF
MODE
SPEED
TIMER
TEMP/TIME
TEMP/TIME
NOTE: Remove and discard protective film prior to use. The remote control runs on one CR2025 battery (included).
Replace battery after 6 months of use, or when the remote control starts to lose power. To change battery,
first remove screw on back panel of remote.
15
Domestic Air Conditioner
Parts and Functions
POWER
Prbutton, the air conditioner will operate in Energy Save mode, low fan speed and temperature of
72°F. You can select any other mode to satisfy your needs.ess ON/OFF to turn on the air conditioner.
When you first press the ON/OFF
Mode
Press MODE to choose Fan, Energy Save, Cool or Dehum.
Speed
Press SPEED to choose High, Med, Low or Auto Cool.
TIMER
To set the air conditioner to turn off after a set amount between 1 hour and 24 hours (unit must be ON):
1. Press TIMER. Timer OFF indicator light on the air conditioner control panel will flash.
2. Press the TEMP/TIME up or down arrow button to change the delay time from 1 hour to 24 hours.
3. After 5 seconds, Timer OFF indicator light on the air conditioner control panel will remain on.
To set timer to turn on the air conditioner, keeping previous settings:
1. Turn on the air conditioner.
2. Press TIMER. Timer On indicator light on the air conditioner control panel will flash.
3. Press the TEMP/TIME up or down arrow button to change the delay time from 1 hour to 24 hours.
4. After 5 seconds, Timer On indicator light on the air conditioner control panel will remain on.
To clear timer delay program:
NOTE: Air conditioner can be either on or off.
Press TIMER until Timer indicator light turns off.
To see or change the remaining time (in hours):
TIMER OFF:
1. Press the TEMP/TIME up or down arrow button to increase or decrease the time.
2. After 5 seconds, the display on the air conditioner control panel will show the remaining time to Timer Off.
TIMER ON:
1. Display on the air conditioner control panel will show remaining time.
2. Press the TEMP/TIME up or down arrow button to increase or decrease the time.
16
Domestic Air Conditioner
Abnormity Diagnose
7 . Abnormity Diagnose
1.Sensor Diagnose:
2 seconds after the sensors open circuit or short circuit , the unit will turn off automatically and the LED wil
show E0 until the sensors resume .
Firstly check whethe r Terminal CN
on
the indoor mainbo ard contact well or
NO
Pull out the terminals on the indoor
mainboard and reinsert them.
not?
YES
Pull the sensor out of the mainboard
1) Measure the value of resis tance
betwe en its two jumper s
2) Measure the temp erature at the
YES
Replace with new sensor.
room tempe rature sensing head.
Check the specificati ons of the senso r
to
decide
whether
the
sensor
is
damaged or not?
NO
The Indoor PCB is broken.
YES
17
Replace with new indoor PCB
Domestic Air Conditioner
Abnormity Diagnose
Check whether the keystroke can’t
NO
PCB is broken, replace a new PCB.
get up with pressure.
YES
Repair the keystrok es on electrical
box to keep them away from the
keystrokes on PCB.
18
Domestic Air Conditioner
System Flow Chart
8. System Flow Chart
19
Domestic Air Conditioner
CN32
10
9
8
7
6
5
4
3
2
1
+5V
110VAC-L
1
R80
1
2
3
4
5
6
7
8
CN5
+5V
E4
4.7uF-50V
0.1uF-275VAC
CX1
CN6
T3.15A/250VAC
1
1
2
3
FUSE1
RV1
110V-N
110V-L
2
1
CN15
1
D250
C8
1B
2B
3B
4B
5B
6B
7B
E
0.1uF
1C
2C
3C
4C
5C
6C
7C
COM
IC5
ULN2003-SOP16
+5V
E7
4.7uF-50V
1
2
CN30
16
15
14
13
12
11
10
9
+12V
R69
R68
+12V
3
2
1
CN31
1N4007(1A-1000V)
1N4007(1A-1000V)
D4
BUZZ1
PS1440P02B-T
1N4007(1A-1000V)
D2
D3
CN18
1N4007(1A-1000V)
D1
R67
+12V
E5
1000uF-25V
+12V
C6
0.1uF
+12V
HS1
IC4 MC7805CTG(1A-5V)
1
3
INPUT OUTPUT
2
CN12
1
2
3
GND
K1
1
+12V
2
K2
1
+12V
2
K3
1
+12V
2
K4
1
+12V
2
K6
1
2
3
4
3
4
3
4
3
CN13
CN10
1
D250
CN9
1
D250
CN8
1
D250
E6
470uF-16V
110VAC-L
1
C42 0.01uF-275VAC
110V-N
R119
110V-L
C7
0.1uF
+5V
1
4
3
4
CN11
D250
Circuit Diagram
9.Circuit Diagram
Domestic Air Conditioner
R152
R156
R157
R155
+5V
PG2
PG1
VCC
C
PPG21/P67
PPG20/P66
PPG11/P65
PPG10/P64
R154
+5V
0.1uF
C2
1
2
3
4
5
6
7
8
C9
E3
C1
E1
0.1uF 0.1uF 100uF-16V100uF-16V
+5V
R153
R158
R150
R47
+5V
R46
R24
+5V
+5V
R81
POWER
C3
0.1uF
R11
C4
0.1uF
24
23
22
21
20
19
18
17
D10
RLS4148
SW1
P13/PPG00
P12/DBG
P11/PPG11
P10/PPG10
P07/INT07/AN07
P06/INT06/AN06
P05/INT05/AN05
P04/INT04/AN04/SIN
IC1
MB95F334K-LQFP32
R159
R151
+5V
32
31
30
29
28
27
26
25
VSS
X1/PF1
X0/PF0
PF2/RST
P17
P16/PPG21
P15/PPG20
P14/PPG01
PPG01/P63
PPG00/P62
INT09/P61
INT08/P60
P00/INT00/AN00
P01/INT01/AN01
P02/INT02/AN02
P03/INT03/AN03/SOT
9
10
11
12
13
14
15
16
R31
+5V
R37
R38
R39
R40
R41
R42
R12
TIMER
SW5
D11
RLS4148
C11
0.001uF E2
4.7uF-50V
R21
R43
R44
+5V
R48
+5V
UP
SW3
D12
RLS4148
SPEED
SW7
D13
RLS4148
CON1
1
2
3
4
5
6
7
8
9
10
1 REV1
2 HS0038B
3
R65
R66
C14
0.1uF
+5V
R27
R7
+5V
P2
SS8550
R70
R28
5
10
DOWN
SW2
D14
RLS4148
LED2
P3
SS8550
MODE
SW6
D15
RLS4148
LED1
ZDD-0362G-R21
1
4
3
9
8
7
6
2
+5V
LED4
D16
RLS4148
+5V
R18
R19
LED6
P4
SS8550
LED7
+5V
R45
R82
N1
SS8050
LED5
R71
FILTER RESET
SW4
LED3
R29
R72
R62
R56
R60
LED8 LED14 LED10 LED9
R30
R61
LED11
R1
LED12 LED13
P5
SS8550
Circuit Diagram
21
Domestic Air Conditioner
Wiring diagram
10. Wiring diagram
WIRING DIAGRAM
TRANSFORMER
0010519540B
COMPRESSOR
M
FAN MOTOR
M
~
L
M H
B
BR
W(or GR)
CAPACITOR
C
4
R(or B)
BL(or R)
COMP.RELAY
CN18
B@(or BR)
G(Y/G)
BL(or R)
CN5
AMBIENT
TEMP.
SENSOR
CN31 L
L M H
CN32
CON1
GR: GRAY
BR: BROWN
BL: BLUE
R: RED
B: BLACK
W: WHITE
Y/G: YELLOW/GREEN
FUSE1
T3.15A/250VAC 3
B(or W)
HERM
R
CN30
S
FAN
BL
N
~
C R
UV LIGHT
W@(orBL)
POWER SUPPLY
NOTE:
THE DOTTED PART MAY NOT SED
22
Domestic Air Conditioner
The End
Sincere Forever
Haier Group
Haier Industrial Park, No.1, Haier Road
266101, Qingdao, China
E-mail: [email protected]
Edited by: GuanLi
LiuSUE
Signed by:WangRuoFeng
Tel: +86 532 88935350
Http://www.haier.com
Factory Model NO. HWE10XCN
Some models may have an additional
letter after the model number.
Approved by: ZhangPeng
Domestic Air Conditioner
© Copyright 2026 ExpyDoc