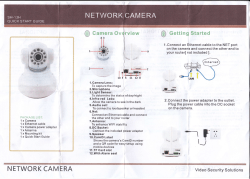
PROFESSIONAL SURVEILLANCE & SECURITY SYSTEM
4 PC/Mac Configuration
01
02
Install the software from the CD that is
provided or from “www.orionlive.com.au”
website.
04
PROFESSIONAL SURVEILLANCE & SECURITY SYSTEM
5Warranty
Click settings for more camera options.
Add the camera
( UID and password
are located under
the camera)
PROFESSIONAL SURVEILLANCE & SECURITY SYSTEM
Arlec guarantees this product in accordance with the Australian
Consumer Law.
Arlec also warrants to the original first purchaser of this product
(“you”) from a retailer that this product will be free of defects
in materials and workmanship for a period of 12 months from
the date of purchase; provided the product is not used other
than for the purpose, or in a manner not within the scope of the
recommendations and limitations, specified by Arlec, is new and not
damaged at the time of purchase, has not been subjected to abuse,
misuse, neglect or damage, has not been modified or repaired
without the approval of Arlec and has not been used for commercial
purposes (“Warranty”).
Add the camera manually
Register an account by entering your E-mail
address and unique password.
06
Change your camera password.
The default password is for setup purposes
only; use a mix of UPPERCASE, lowercase and
numbers for the password.
If you wish to claim on the Warranty, you must, at your own expense,
return the product, and provide proof of original purchase and your
name, address and telephone number, to Arlec at the address below
or the retailer from whom you originally purchased the product within
12 months from the date of purchase.
Arlec will (or authorise the retailer to) assess any claim you may make
on the Warranty in the above manner and if, in Arlec’s reasonable
opinion, the Warranty applies, Arlec will at its own option and
expense (or authorise the retailer to) replace the product with the
same or similar product or repair the product and return it to you
or refund the price you paid for the product. Arlec will bear its
own expenses of doing those things, and you must bear any other
expenses of claiming on the Warranty.
Wi-Fi NETWORK CAMERA
SC201
Quick INSTALLATION GUIDE
REMOTE
MONITORING &
CONTROL FROM
SMARTPHONES,
TABLETS & PCs
PAN & TILT
MOTION CONTROL
The Warranty is in addition to other rights and remedies you
may have under a law in relation to the product to which the
Warranty relates.
Tick the Wi-Fi option and enter the Wi-Fi router
information to access the camera wirelessly
without the ethernet cable.
OR
Search connected camera on local network
03
07
(Optional) Configure camera Wi-Fi settings.
To access the camera wirelessly, go to camera
settings and enter your Wi-Fi details. After
successful configuration, you can unplug
Ethernet connection and relocate the camera.
Our goods come with guarantees that cannot be excluded under
the Australian Consumer Law. You are entitled to a replacement
or refund for a major failure and for compensation for any other
reasonably foreseeable loss or damage. You are also entitled to have
the goods repaired or replaced if the goods fail to be of acceptable
quality and the failure does not amount to a major failure.
IMPORTANT
BEFORE RETURNING THIS
PRODUCT TO THE RETAILER
Login with the details you have registered.
WI-FI SSID
PLEASE CONTACT
IF YOU HAVE ANY CONCERNS OR
PROBLEMS WITH THIS PRODUCT
05
Double click on the added camera to view
live video.
Camera
Power
wps/reset
Button
SECURITY WITH VISION
WI-FI NETWORK CAMERA SC201
www.orionlive.com.au
reset to factory settings
1. Turn ON the camera and wait until it
finishes the start-up routine.
2. Now press and hold the WPS/reset button
for 5 seconds and release.
3. The camera is now set to factory settings.
Customer Service Phone: (03) 9982 5111
(Monday to Friday 8.30am – 5.30pm EST)
Email: [email protected]
For further information visit www.orionlive.com.au
Arlec Australia Pty. Ltd. ACN 009 322 105
(“Arlec”) gives the Warranty.
Arlec’s telephone number, address and email address are:
Customer Service: (03) 9982 5111
New Zealand Toll Free: 0800 003 329
Building 3, 31 – 41 Joseph Street, Blackburn North, Victoria, 3130
Blackburn North LPO, P.O. Box 1065, Blackburn North, 3130
Email: [email protected]
CPIN002933/2
WI-FI NETWORK CAMERA SC201
SECURITY WITH VISION
AUDIO
& MOTION
NIGHT
VISION
HIGH
DEFINITION
MICROPHONE
& SPEAKER
SD CARD
STORAGE
PAN
& TILT
Wi-Fi
CONNECTIVITY
SIMPLE
SETUP
Instructions for use
Important! Please read these instructions carefully.
NOTE: SC201 camera requires network device (e.g. wireless/non-wireless router, network switch etc. that is connected to internet or internal
network for setup and use. Network device is not supplied with this kit.
SC201 camera might experience network, motion command and live transmission delay issues. This is normal, due to the connected
network, 3G/4G mobile network, server overflow or internet upstream speed, download speed and video resolution. To reduce delay, it is
recommended to reduce the video quality, or contact your mobile/network service provider.
SECURITY WITH VISION
WI-FI NETWORK CAMERA SC201
www.orionlive.com.au
SECURITY WITH
VISION 3
PROFESSIONAL SURVEILLANCE & SECURITY SYSTEM
3 Apple/android Configuration
1identification
01
ANTENNA
Adjustable
Lens
Mounting
bracket
02
Install the Oricam application from Google Play or App Store.
Register an account by entering your E-mail
address and unique password.
03
Login with the details you have registered.
infra-red led
TILT/PAN
CAMERA HEAD
Audio
out
Micro SD
Card slot
rj45
ethernet
port
wps/reset
Power
Socket
external
I/O
Oricam
MICROPHONE
Indication
LIGHT
Speaker
Microphone
Responsible use: Please ensure this equipment is used in accordance with any local laws or regulations, especially if your device is
capable of audio recording. Users of this equipment should at all times act responsibly and consider the reasonable expectations of privacy of
individuals. Surveillance should be for a legitimate purpose related to the activities of the person or organisation conducting it.
We recommend that you clearly indicate (written or otherwise) that surveillance is in operation in the monitored area.
2 Connection diagram
04
05
Follow these steps to add camera to your account.
Camera UID, password and QR code are located under the camera
Follow these steps to change camera
password and configure Wi-Fi settings.
Internet
Internet
Option 1
Wirelessly Connected
to Internet
WI-FI SETTINGS
Power
Adapter
Option 2
Local Connection
search connected
camera on local
network
ADD Camera
manually
Ethernet
Cable
Or
WI-FI SSID
SETTINGS MENU
scan camera
qr code
SC201 REAR VIEW
Internet
CAMERA
Successfully
CONNECTED
PRESS TO ADD
NEW CAMERA
Ethernet
Cable
Ethernet
Cable
2
SECURITY WITH VISION
or
Power
Adapter
WI-FI NETWORK CAMERA SC201
www.orionlive.com.au
swipe screen
for pan & tilt
control
PRESS AND HOLD TO
ACCESS SETTINGS
MENU
Tap to view live
video
CHANGING PASSWORD
© Copyright 2026 ExpyDoc