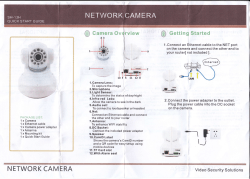
SH-13F
QUICK START GUIDE
NETWORK CAMERA
1
Camera Overview
2
Getting Started
1.Connect an Ethernet cable to the NET port
on the camera and connect the other end to
your router[ not included ].
PACKAGE LIST:
1 x Camera
1 x Ethernet cable
1 x Camera power adapter
1 x Antenna
1 x Mounting kit
1 x Quick Start Guide
NETWORK CAMERA
1.Camera Lens:
To capture the image
2.Microphone
3.Light Sensor:
To determine the status of day/night
4.Infra-red Leds:
Allow the camera to see in the dark
5.Audio out:
To connect to loudspeaker or headset
6.Net:
Connect an Ethernet cable and connect
the other end to your router
7.Antenna:
To enhance WIFI stability
8.DC Socket:
Connect the included power adapter
9.Speaker
10.CamID Label
Shows the camera’s CamID number
and a QR code for easy setup using
mobile devices
2.Connect the power adapter to the outlet.
Plug the power cable into the DC socket
on the camera.
Video Security Solutions
CONNECTING TO YOUR CAMERA ON
MOBILE PHONE AND TABLETS
OPTIONAL
System requirements:
iPhone/iPad: iOS v4.0 or higher and
a valid iTunes account.
Android:
DON’T USE IF YOUR ROUTER
DOES NOT SUPPORT WIFI
Download Deviceclient:
http://www.anjiel.com/download/setup.msi
To install Deviceclient
NOTE: The camera must be connected
to your router through an Ethernet cable
before you setup it’s WiFi connection.
2.Tap the icon on the
homescreen to open AJT.
1.Connect to your camera using P2P.
Your mobile device must be connected to
your WiFi,not using 3G/Mobile network.
3. Click “Add Camera” to add a
camera.
2.Tap the “System Setting” button.
3.Choose “Wifi Setting”.
4.Click “Scan QR Code”,then scan the QR 4.Click “Wifi manager” and choose a SSID,
Code on the reverse side of the camera,
enter SSID’s password, then click “Done”
or you can just enter the CamID under “
on the right corner. After reboot, your
CameraID” to add the camera if you wish. camera is connected to your Wifi.
When you finish,click “Done” .
5.Pull up the Ethernet cable.
NOTE:QR Code setup is not compatible
with 1st generation iPad.If you have a
iPad like this,please manually enter the
CamID printed on the camera.
1.After installing,double click ”
Deviceclient” icon to run
the software.
2.Click “Sidebar” button,
then choose “Device List”.
DON’T USE IF YOUR ROUTER
DOES NOT SUPPORT WIFI
NOTE: The camera must be connected
to your router through an Ethernet cable
before you setup it’s WiFi connection.
1.Run “Deviceclient”.
2.Active the camera,right click on the
display area and choose “Settings”.
3.Choose “WiFi setting”,under Wifi list,
click “Search”,and choose your SSID,
enter the Password of this SSID,then
click Setup.
3.Click “Add”.
4.Enter a Device name,
under the video option,
choose ”JPEG”,and device
“MT”.Choose “P2P” and
enter the CamID, after
that,click ”Done”.
4.After reboot,your camera is connected
to your Wifi, and now you can pull up the
ethernet cable!
5.Tap the name of the camera under
the camera list to connect to the camera.
5.Double click the name under
camera list or just drag it to
the area to display.
NETWORK CAMERA
OPTIONAL
WiFi Setup
WiFi Setup
Android v2.3 or higher.
1.Download AJT2.1 from APP Store
(IOS)or Scan this qr code(Android).
CONNECTING TO YOUR CAMERA ON PC
© Copyright 2026 ExpyDoc