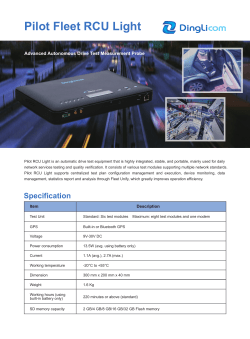
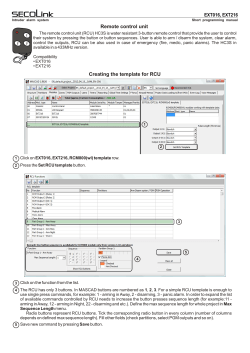
CRS-435XG
CONTROL UNIT
Hopping codes-never the same code is transmitted!
BZ2
R
A
D
I
O
L5
TR1
R25
SW3
SW2
r
PR4 PR3
1 2 3 4 5
BZ3
9 10 11 12 13
SW2, SW3 - learning switches
SW1
- only in CRS-436XG
R25
- opening/closing time potentiometer
PR3..PR4
- relays
L5
- current mode LED
RADIO - radio connector
TR
- power transformer
1-5,9-13 - motor, photocell, opening/closing limit switches connectors
G4
- only in CRS-436XG
BZ1
- only in CRS-436XG
BZ3
- 315mA Fuse
BZ2
- 3.15A Fuse – M2 motor power
PARAMETERS
Supply voltage
Current consumption
Radio frequency
Antenna impedance
Relays
Number of channels
Range
230VAC
35 mA / Stand-by
433.92 MHz
50Ω
JW1aFSN (10A/250VAC)
1
~150 m
1
2
3
4
5
9
10
11
12
13
-+
12V FOT
MN
P
M
Connect to a 6A
differential switch
sensitivity 30mA
230V~
1
50Hz
Wiring to terminal strip
4,5 Photocell [P] (normally closed)
3,5 Manual button [MN] (normally open)
9 Open wire [M]
10 Close wire [M]
11 Common wire [M]
12,13 ~230V/50Hz
General description.
This unit is to control 230VAC motors. One unit can control one motor.
CRS-435XG unit can be controlled in two ways: by use of the manual button
or by use of the remote control units. Safety devices (photocells and others) can be
connected to the unit.
Signals from RCU or local button will cause such a sequence:
One direction move; Stop; Opposite direction move; Stop; And so on
As long as the signal (open circuit) from photocell is present on the corresponding
input the closing will be blocked. The time the power is being supplied to the motor
can be adjusted in range of 10 up to 120 seconds.
The time of opening or closing phase can be adjusted by means of the R25
potentiometer. The time adjusted by R25 must be longer than time required to open
and to close the gate.
Wiring.
Power (230VAC) should be connected to terminals 12(N) and 13(L1). For safety
reasons a 6A differential switch-sensitivity 30mA has to be used. Terminals 9, 10, 11
are to be connected to the motor.
The ground of unit is available on terminals 1 and 5.
Photocells should be connected to terminals 4 and 5. Manual button M should be
connected to terminals 3 and 5.
In any case if photocells are not used the short wire must be on 4 and 5 terminals.
Photocell should be normally closed device.
Programming of the unit.
Unit can be controlled by up to 15 different RCU. Every RCU has different number
- that is why every unit must be preprogrammed to cooperate with particular RCU. To
do that we have to enter so-called learning option. Pressing and holding SW3 switch
achieve this. The L5 (red LED) will light for about 1 sec indicating that learning option
has been entered. The number of 0.5sec flashes will inform us how many RCU are
learned already by unit. If there is no flashing it means that unit is not
preprogrammed. To teach the unit to cooperate with particular RCU we have to press
the button on this RCU (still holding SW3) until L5 will light for about 1 second. This is
the confirmation that unit is ready to cooperate with this RCU. After this the unit will
show the number of RCU preprogrammed by the number of 0.5 sec. flashes. If the
number after the teaching has increased by 1 it means that this RCU has been
registered. If number of flashes has not increased that means that this RCU had
been registered before or that unit has registered 15 RCU. To be back in normal
option you have to release SW3 switch. The L5 will light for about 2 seconds
confirming that normal option has been entered. Registered codes are stored in
EEPROM so they are safe in case power is off.
Erasing of registered codes.
If there is such a need all registered codes can be erased. This is possible by
pressing SW3 and SW2 at the same time
Manufacturer:
P.I.E. INEL sp. z o.o.
ul. Mostowa 1
tel/fax. (58) 301-15-81
tel. (58) 305-49-77
© Copyright 2026 ExpyDoc