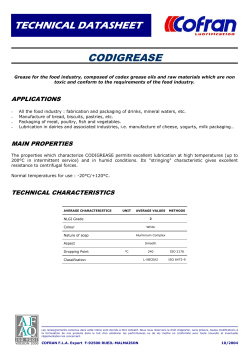
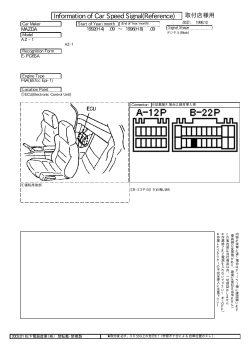
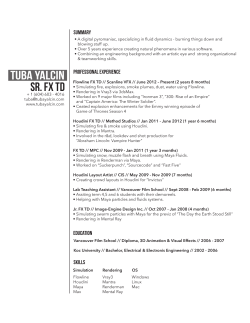
EDIUS XRE User Guide www.grassvalley.com F3951404281 April 2014 Copyright Copyright 2010-2014 Grass Valley K.K. All rights reserved. Portions of software © 2000 – 2014, Microsoft Corporation. All rights reserved. This document may not be copied in whole or in part, or otherwise reproduced except as specifically permitted under U.S. copyright law, without the prior written consent of Grass Valley, Inc., P.O. Box 59900, Nevada City, California 95959-7900. This product may be covered by one or more U.S. and foreign patents. Disclaimer Product options and specifications subject to change without notice. The information in this manual is furnished for informational use only, is subject to change without notice, and should not be construed as a commitment by Grass Valley, Inc. Grass Valley, Inc. assumes no responsibility or liability for any errors or inaccuracies that may appear in this publication. U.S. Government Restricted Rights Legend Use, duplication, or disclosure by the United States Government is subject to restrictions as set forth in subparagraph (c)(1)(ii) of the Rights in Technical Data and Computer Software clause at DFARS 252.277-7013 or in subparagraph c(1) and (2) of the Commercial Computer Software Restricted Rights clause at FAR 52.227-19, as applicable. Manufacturer is Grass Valley, Inc., P.O. Box 59900, Nevada City, California 95959-7900 U.S.A. Trademarks and Logos Grass Valley, K2, Aurora, Summit, Dyno, Solo, Infinity, Turbo, Profile, Profile XP, NetCentral, NewsBrowse, NewsEdit, NewsQ, NewsShare, NewsQ Pro, and Media Manager are either registered trademarks or trademarks of Grass Valley, Inc. in the United States and/or other countries. Grass Valley, Inc. products are covered by U.S. and foreign patents, issued and pending. Additional information regarding Grass Valley, Inc. trademarks and other proprietary rights may be found at www.grassvalley.com. Other trademarks and logos used in this document are either registered trademarks or trademarks of the manufacturers or vendors of the associated products, such as Microsoft® Windows® operating system, Windows Media® player, Internet Explorer® internet browser, and SQL Server™. QuickTime and the QuickTime logo are trademarks or registered trademarks of Apple, Inc., used under license therefrom. Intel, Pentium, Xeon and Core Duo are the trademarks or registered trademarks of Intel Corporation or its subsidiaries in the United States of America and other countries. They are manufactured based on their own license. Manufactured under license from Dolby Laboratories. Dolby and the double-D symbol are trademarks of Dolby Laboratories. Confidential unpublished works. Copyright 1993–2005 Dolby Laboratories. All rights reserved. 2EDIUS XRE ― User Guide Manual Explanation Revision Status •If there are any variations between the explanation in this manual and the actual application method, priority is given to the actual application method. •The screens used as examples in this manual are those of the development stage, so they may vary from those in the final product. •This manual is written for people who have a basic knowledge of how to use a computer. If there are no special instructions, perform the same operation as a normal computer operation. Rev Date Description July 8, 2013 Release F3951307031 April 28, 2014 Release F3951404281 EDIUS XRE ― User Guide 3 Contents Safety Summaries��������������������������������������������������������������������������6 General Safety Summary........................................................................6 Safety Terms and Symbols......................................................................7 Service Safety Summary.........................................................................8 Certifications and Compliances.................................................................8 Laser Compliance.................................................................................9 Résumé des mesures de sécurité������������������������������������������������������ 10 Résumé des mesures de sécurité générales............................................... 10 Termes et symboles de sécurité.............................................................. 11 Résumé des mesures de sécurité d’entretien.............................................. 12 Certifications et conformités.................................................................. 12 Conformité laser................................................................................. 14 1 Before Using Before Using������������������������������������������������������������������������������� 15 Package Contents............................................................................... 15 Grass Valley Product Support����������������������������������������������������������� 16 Web Technical Support......................................................................... 16 Phone Support................................................................................... 16 Authorized Support Representative.......................................................... 17 2 Overview EDIUS XRE Overview��������������������������������������������������������������������� 18 Three elements comprising EDIUS XRE..................................................... 18 4EDIUS XRE ― User Guide 3 Setup Installing the controller/engine��������������������������������������������������������� 20 Activation of Serial (Online)������������������������������������������������������������� 21 Activation of Serial (Offline)������������������������������������������������������������ 22 Installing the client����������������������������������������������������������������������� 24 4 EDIUS XRE Settings Setting Example��������������������������������������������������������������������������� 25 Configuring the controller���������������������������������������������������������������� 26 Configuring XREController..................................................................... 26 Configuring XRE Monitor (management mode)............................................ 28 Configuring the engine������������������������������������������������������������������� 31 Connection settings to the controller........................................................ 31 Plug-in settings.................................................................................. 34 Configuring the client��������������������������������������������������������������������� 35 Configuring XRE Monitor (client mode)..................................................... 35 5 EDIUS XRE Operations Requesting Rendering Jobs������������������������������������������������������������� 38 Things to check when creating a project on an client..................................... 38 Requesting a rendering job from an client.................................................. 39 XRE Monitor Operations����������������������������������������������������������������� 41 Checking job status............................................................................. 41 About error notifications....................................................................... 44 Checking job properties........................................................................ 45 Sorting the order to perform jobs in XRE Monitor (management mode)............... 46 6 Troubleshooting EDIUS XRE ― User Guide 5 Safety Summaries Safety Summaries General Safety Summary Review the following safety precautions to avoid injury and prevent damage to this product or any products connected to it. While using this product, you may need to access other parts of the system. Read the General Safety Summary in other system manuals for warnings and cautions related to operating the system. Injury Precautions Use Proper Power Cord To avoid fire hazard, use only the power cord specified for this product. Ground the Product This product is grounded through the grounding conductor of the power cord. To avoid electric shock, the grounding conductor must be connected to earth ground. Before making connections to the input or output terminals of the product, ensure that the product is properly grounded. Do Not Operate Without Covers To avoid electric shock or fire hazard, do not operate this product with covers or panels removed. Do Not Operate in Wet/Damp Conditions To avoid electric shock, do not operate this product in wet or damp conditions. Do Not Operate in an Explosive Atmosphere To avoid injury or fire hazard, do not operate this product in an explosive atmosphere. Avoid Exposed Circuitry To avoid injury, remove jewelry such as rings, watches, and other metallic objects. Do not touch exposed connections and components when power is present. Product Damage Precautions Use Proper Power Source Do not operate this product from a power source that applies more than the voltage specified. 6EDIUS XRE ― User Guide Safety Summaries Provide Proper Ventilation To prevent product overheating, provide proper ventilation. Do Not Operate With Suspected Failures If you suspect there is damage to this product, have it inspected by qualified service personnel. Battery Replacement To avoid damage, a battery must be replaced once every five years. Please contact Grass Valley Product Support to replace the battery. Safety Terms and Symbols Terms in This Manual These terms may appear in this manual: WARNING: Warning statements identify conditions or practices that can result in personal injury or loss of life. CAUTION: Caution statements identify conditions or practices that may result in damage to equipment or other property, or which may cause equipment crucial to your business environment to become temporarily non-operational. Terms on the Product These terms may appear on the product: DANGER indicates a personal injury hazard immediately accessible as one reads the marking. WARNING indicates a personal injury hazard not immediately accessible as you read the marking. CAUTION indicates a hazard to property including the product. Symbols on the Product The following symbols may appear on the product: DANGER high voltage Protective ground (earth) terminal ATTENTION – refer to manual EDIUS XRE ― User Guide 7 Safety Summaries Service Safety Summary WARNING: The service instructions in this manual are intended for use by qualified service personnel only. To avoid personal injury, do not perform any servicing unless you are qualified to do so. Refer to all safety summaries before performing service. Do Not Service Alone Do not perform internal service or adjustment of this product unless another person capable of rendering first aid and resuscitation is present. Disconnect Power To avoid electric shock, disconnect the main power by means of the power cord or, if provided, the power switch. Use Care When Servicing With Power On Dangerous voltages or currents may exist in this product. Disconnect power and remove battery (if applicable) before removing protective panels, soldering, or replacing components. To avoid electric shock, do not touch exposed connections. Certifications and Compliances Canadian Certified Power Cords Products that are relocated to other countries should use nationally certified power cords and plugs to ensure safe operation of the product. FCC Emission Control This equipment has been tested and found to comply with the limits for a Class A digital device, pursuant to Part 15 of the FCC Rules. These limits are designed to provide reasonable protection against harmful interference when the equipment is operated in a commercial environment. This equipment generates, uses, and can radiate radio frequency energy and, if not installed and used in accordance with the instruction manual, may cause harmful interference to radio communications. Operation of this equipment in a residential area is likely to cause harmful interference in which case the user will be required to correct the interference at his own expense. Changes or modifications not expressly approved by Grass Valley can affect emission compliance and could void the user’s authority to operate this equipment. 8EDIUS XRE ― User Guide Safety Summaries Canadian EMC Notice of Compliance This digital apparatus does not exceed the Class A limits for radio noise emissions from digital apparatus set out in the Radio Interference Regulations of the Canadian Department of Communications. This product must not be used in residential areas. EMC Directive Class A Warning This product must not be used in residential areas. FCC Emission Limits This device complies with Part 15 of the FCC Rules. Operation is subject to the following two conditions: (1) This device may not cause harmful interference, and (2) this device must accept any interference received, including interference that may cause undesirable operation. Laser Compliance Laser Safety Requirements The system used in this product is a Class 1 certified laser product. Operating this product outside specifications or altering its original design may result in hazardous radiation exposure, and may be considered an act of modifying or new manufacturing of a laser product under U.S. regulations contained in 21CFR Chapter 1, subchapter J or CENELEC regulations in HD 482 S1. People performing such an act are required by law to recertify and reidentify this product in accordance with provisions of 21CFR subchapter J for distribution within the U.S.A., and in accordance with CENELEC HD 482 S1 for distribution within countries using the IEC 825 standard. Laser Safety Laser safety in the United States is regulated by the Center for Devices and Radiological Health (CDRH). The laser safety regulations are published in the “Laser Product Performance Standard,” Code of Federal Regulation (CFR), Title 21, Subchapter J. The International Electrotechnical Commission (IEC) Standard 825, “Radiation of Laser Products, Equipment Classification, Requirements and User’s Guide,” governs laser products outside the United States. Europe and member nations of the European Free Trade Association fall under the jurisdiction of the Comité Européen de Normalization Electrotechnique (CENELEC). EDIUS XRE ― User Guide 9 Résumé des mesures de sécurité Résumé des mesures de sécurité Résumé des mesures de sécurité générales Consultez les mesures de sécurité suivantes afin d’éviter toute blessure corporelle et dommage au produit, et pour tous les produits qui y sont connectés. Lors de l’utilisation de ce produit, il est possible que vous ayez à accéder à d’autres parties du système. Consultez le Résumé des mesures de sécurité générales du manuel des autres systèmes pour prendre connaissance des mises en garde et des avertissements relatifs à leur utilisation. Précautions relatives aux blessures Utiliser un cordon d’alimentation approprié Afin d’éviter un risque d’incendie, utilisez uniquement le cordon d’alimentation spécifié pour ce produit. Mettre le produit à la terre Ce produit est mis à la terre au moyen du conducteur de terre du cordon d’alimentation. Afin d’éviter un choc électrique, le conducteur de terre doit être connecté à la terre. Avant de procéder à d’autres connexions aux terminaux entrants et sortants du produit, assurezvous qu’il est mis à la terre de façon adéquate. Ne pas faire fonctionner le produit sans couvercle Afin d’éviter un choc électrique ou un risque d’incendie, ne faites pas fonctionner ce produit lorsque que les couvercles ou les panneaux sont retirés. Ne pas faire fonctionner le produit dans des conditions humides Afin d’éviter un choc électrique, ne faites pas fonctionner ce produit dans des conditions humides. Ne pas faire fonctionner le produit dans une atmosphère explosive Afin d’éviter une blessure corporelle ou un risque d’incendie, ne faites pas fonctionner ce produit dans une atmosphère explosive. Éviter les circuits à nu Afin d’éviter une blessure corporelle, retirez tous vos bijoux, tels que bagues, montres et autres objets métalliques. Ne touchez pas les connexions ni les composants à nu lorsque l’appareil est sous tension. 10EDIUS XRE ― User Guide Résumé des mesures de sécurité Précautions relatives aux dommages au produit Utiliser une source d’alimentation appropriée Ne faites pas fonctionner ce produit avec une source d’alimentation qui applique une tension supérieure à celle spécifiée. Prévoir une ventilation adéquate Afin d’empêcher une surchauffe du produit, prévoyez une ventilation adéquate. Ne pas faire fonctionner le produit en cas de soupçons de panne Si vous remarquez que ce produit est endommagé, faites-le examiner par un personnel d’entretien qualifié. Remplacement de la pile Afin d’éviter tout dommage, la pile doit être remplacée une fois tous les cinq ans. Veuillez contacter le support technique de Grass Valley pour le remplacement de la pile. Termes et symboles de sécurité Termes utilisés dans ce manuel Les termes suivants peuvent apparaître dans ce manuel : MISE EN GARDE: Les indications de mise en garde identifient des conditions ou des pratiques qui peuvent provoquer des blessures corporelles ou le décès. AVERTISSEMENT: Les indications d’avertissement identifient des conditions ou des pratiques qui peuvent provoquer des dommages à l’équipement ou à d’autres biens, ou qui peuvent rendre temporairement non opérationnel un équipement indispensable à l’environnement de votre activité. Termes relatifs au produit Les termes suivants peuvent apparaître sur le produit : DANGER indique un risque de blessure corporelle immédiatement accessible lors de la lecture de l’inscription. MISE EN GARDE indique un risque de blessure corporelle non immédiatement accessible lors de la lecture de l’inscription. AVERTISSEMENT indique un risque relatif aux biens, y compris le produit. EDIUS XRE ― User Guide 11 Résumé des mesures de sécurité Symboles sur le produit Les symboles suivants peuvent apparaître sur le produit : DANGER haute tension Prise de mise à la masse (terre) ATTENTION – consultez le manuel Résumé des mesures de sécurité d’entretien MISE EN GARDE: Les instructions d’entretien de ce manuel sont destinées uniquement à du personnel d’entretien qualifié. Afin d’éviter toute blessure corporelle, ne procédez à aucun entretien à moins de posséder les qualifications requises. Consultez tous les résumés des mesures de sécurité avant de procéder à l’entretien. Ne pas procéder seul à l’entretien Ne procédez pas à un entretien ou à un ajustement interne de ce produit à moins qu’une autre personne en mesure de prodiguer les premiers soins ou une réanimation ne soit présente. Débrancher l’alimentation Afin d’éviter un choc électrique, coupez l’alimentation principale au moyen du cordon d’alimentation ou, le cas échéant, de l’interrupteur d’alimentation. Faire preuve de prudence lors de l’entretien lorsque l’appareil est sous tension Ce produit peut être le cadre de tensions et d’intensités dangereuses. Débranchez l’alimentation et retirez la pile (le cas échéant) avant de retirer les panneaux de protection, de procéder à une soudure ou de remplacer des composants. Afin d’éviter un choc électrique, ne touchez pas les connexions à nu. Certifications et conformités Cordons d’alimentation certifiés pour le Canada Les produits délocalisés dans d’autres pays doivent utiliser des cordons d’alimentation et des fiches certifiés pour assurer une utilisation en toute sécurité du produit. 12EDIUS XRE ― User Guide Résumé des mesures de sécurité Contrôle d’émission du FCC Le présent équipement a été testé et approuvé comme répondant aux normes des dispositifs numériques de classe A, conformément à la Partie 15 des règlements du FCC. Ces limites sont conçues pour fournir une protection raisonnable contre les brouillages préjudiciables dans un environnement commercial. Cet appareil produit, utilise et peut dégager de l’énergie radioélectrique et, s’il n’est pas installé et utilisé selon les instructions, il peut être la source d’interférences gênantes pour les communications radio. L’utilisation de cet appareil dans une zone résidentielle peut également causer des interférences gênantes, auquel cas l’utilisateur s’engage à mettre fin à ces interférences à ses frais. Les changements et modifications non expressément approuvés par Grass Valley peuvent influer sur la conformité des émissions et pourraient annuler l’autorisation de l’utilisateur à utiliser cet appareil. Avis de conformité de la CEM pour le Canada Le présent appareil numérique n’émet pas de bruits radioélectriques dépassant les limites applicables aux appareils numériques de la classe A prescrites dans le Règlement sur le brouillage radioélectrique édicté par le ministère des Communications du Canada. Ce produit ne doit pas être utilisé dans des zones résidentielles. Directive CEM Avertissement relatif à la classe A Ce produit ne doit pas être utilisé dans des zones résidentielles. Limites d’émission du FCC Cet appareil est conforme à la partie 15 des règlements du FCC. Son utilisation est soumise aux deux conditions suivantes : (1) Cet appareil ne doit pas provoquer d’interférences nuisibles, et (2) cet appareil doit tolérer toute interférence reçue, y compris des interférences qui pourraient provoquer un fonctionnement indésirable. EDIUS XRE ― User Guide 13 Résumé des mesures de sécurité Conformité laser Règles de sécurité relatives au laser Le système utilisé dans ce produit est un laser certifié de classe 1. L’utilisation de ce produit hors des spécifications ou la modification de sa conception d’origine peuvent entraîner une exposition dangereuse à des radiations, et peuvent être considérées comme un acte de modification ou une nouvelle fabrication d’un produit laser, conformément à la réglementation 21CFR des États-Unis, chapitre 1, section J ou de la réglementation CENELEC dans HD 482 S1. Les personnes procédant audit acte doivent, selon la loi, certifier et identifier à nouveau ce produit conformément aux dispositions 21CFR, section J relatives à la distribution aux États-Unis, et conformément à la réglementation CENELEC HD 482 S1 pour la distribution dans les pays utilisant la norme IEC 825. Sécurité laser La sécurité laser aux États-Unis est réglementée par le Center for Devices and Radiological Health (CDRH). La réglementation relative à la sécurité laser est publiée dans le « Laser Product Performance Standard », Code of Federal Regulation (CFR), titre 21, section J. La commission électrotechnique internationale (CEI), norme 825, « Radiation des produits laser, classification des équipements, exigences et mode d’emploi », régit les produits laser à l’extérieur des ÉtatsUnis. L’Europe et les nations membres de l’Association européenne de libre-échange tombent sous la juridiction du Comité Européen de Normalisation Électrotechnique (CENELEC). 14EDIUS XRE ― User Guide Before Using Section 1 Before Using Package Contents Please verify that the following items are included in EDIUS XRE. •EDIUS XRE Installation DVD •EDIUS XRE Client Installation CD •Serial number •EDIUS XRE User Guide (Download) (this book) Note EDIUS XRE ― User Guide •Activation cannot be performed without the serial number. Keep the serial number not to be lost. The serial number cannot be reissued for any reason. 15 Section 1 ― Before Using Grass Valley Product Support For technical assistance, to check on the status of a question, or to report a new issue, contact Grass Valley Product Support via e-mail, the Web, or by phone or fax. Web Technical Support To access support information on the Web, visit the product support Web page on the Grass Valley Web site. You can download software or find solutions to problems by searching our Frequently Asked Questions (FAQ) database. World Wide Web: www.grassvalley.com/support/contact United States/Americas: www.grassvalley.com/ad/contact_customer_support Europe, United Kingdom, Africa and The Middle East Technical Support e-mail address: [email protected] Asia (except Japan and Korea) Technical Support e-mail address: [email protected] Japan and Korea Technical Support e-mail address: [email protected] Phone Support Use the following information to contact product support by phone during business hours. After hours phone support is available for warranty and contract customers. United States/Americas +1 801 222 5204 Europe, United Kingdom, +44 (0)20 8867 6305 Africa and The Middle East Asia (except Japan and +86 21 5869 8668 Korea) 16EDIUS XRE ― User Guide Grass Valley Product Support Authorized Support Representative To locate the support representative for your country, visit the Product Support Web page on the Grass Valley Web site: www.grassvalley. com/support. EDIUS XRE ― User Guide 17 Section Overview 2 EDIUS XRE Overview EDIUS XRE is a system for having a networked external PC perform rendering processes when exporting a project created in EDIUS. On an EDIUS edit terminal, you can perform another task as soon as you request an external PC to perform a rendering process, without waiting until the exporting process is complete. Three elements comprising EDIUS XRE Each rendering process you request from an EDIUS edit terminal is called a "rendering job". EDIUS XRE has networked PCs which have the following three different roles assigned to process rendering jobs. ¾¾Client It is an edit terminal where EDIUS is installed. It requests the controller to perform a rendering job. ¾¾Controller It receives a rendering job request from a client, looks for an engine that can perform the task, and assigns the rendering job to it. The controller communicates with engines periodically. If a response is lost from an engine, the controller will assign the rendering job assigned to the engine to another one and have it performed again. ¾¾Engine It receives an instruction from the controller and processes a rendering job. Request jobs Manage jobs Render jobs Client Controller Engine 18EDIUS XRE ― User Guide EDIUS XRE Overview You can also check the status of rendering jobs in XRE Monitor. If it is started on the controller, XRE Monitor (management mode) is enabled, which allows you to sort the order to perform rendering jobs. System configuration example The following figure shows an example where four clients are connected to a single controller/engine to perform rendering processes. The section 4 describes how to set up EDIUS XRE based on a following system configuration example. EDIUS XRE Settings ►P25 Gigabit Ethernet Fibre Channel Client Server K2 SUMMIT 3G PRODUCTION SERVER K2 MEDIA SERVER Controller/Engine Storage K2 SAS STORAGE K2 SAS STORAGE K2 SAS STORAGE Fibre Channel Switch Client Client Note EDIUS XRE ― User Guide Gigabit Ethernet Switch Client Client •In v 7.31 or later, EDIUS XRE supports the service of Windows. If you use all functions of EDIUS XRE, you need log on a user with Administrator. •EDIUS XRE needs same version of EDIUS which is on the client. In different version of EDIUS, EDIUS XRE will not finish rendering correctly. •If you need to connect with GV STRATUS, EDIUS XRE require the option license. 19 Section Setup 3 Installing the controller/engine Install XREController/GVRenderEngine on a PC you want to use as an controller/engine. Note •Close all other application software including resident software before installation. •Before installing the software on your PC, be sure to login with a user ID (such as Administrator) authorized to change system settings. •XREController/GVRenderEngine cannot be installed on a PC where EDIUS is installed. 1 Set your EDIUS XRE Installation DVD into the DVD drive. Double-click "XREServer_7.xx_xxxx_Setup.exe". 2 Follow the Setup wizard. 3 Click [I Agree] to agree the "License Agreement". POINT •Click [Cancel] to cancel the installation. If you do not agree to the license agreement, stop the installation and contact our customer support in writing. Note •Be sure to read through all of the terms and conditions by scrolling the window. 4 Enter the "User Name", "Password", and then click [Next]. EDIUS XRE is service of Windows. The installation of EDIUS XRE, the account information authorized are required. Note •If you change account information, you need to reinstall EDIUS XRE in order to set the new accout information. 5 Check the item(s) to install, and then click [Next]. Controller : Select “XREController“ Engine : Select “GVRenderEngine“ 20EDIUS XRE ― User Guide Installing the contrroller/engine It is possible to use the controller and engine on a PC. In this case, please select the both of XREController and GVRenderEngine. The installation of XREController/GVRenderEngine begins. 6 Select "I want to reboot my computer now.", and then click [Finish]. Your PC is restarted and the installation is complete. After restarted, the error message about serial registration will be appeared. Note •If the following items are installed on the PC to be used as the client, you must install them on the PC for EDIUS XRE system as well. --Third-party plug-ins --Title fonts Activation of Serial (Online) Activation is performed after the complete of installation.Activation requires internet connectivity environment. The function installed when activation was not performed cannot be used. Note •Activation is required in the GVRenderEngineService installed machine. 1 Click the “start” menu, and then click “All Programs”->”Grass Valley”-> ”Serial number registration”. 2 Enter a serial number,and [OK]. EDIUS XRE ― User Guide 21 Section 3 ― Setup Activation is complete. POINT •Activation in the offline environment is also possible. Activation of Serial (Offline) ►P22 Activation of Serial (Offline) Note •Activation is required in the GVRenderEngineService installed machine. 1 Insert an USB stick memory into free USB port on GVRenderEngineService installed machine. 2 Choose [Start] > [All Programs] > [Grass Valley] > [GV LicenseManager]. 3 GV License Manager will start and click [Offline Activation Create ID File] button. 4 Enter a serial number and click [OK] button. 5 Choose the USB stick as save location and then click [OK] button. 6 Click [OK] button. 7 Eject the USB stick from the machine and then insert into a Windows PC connected to an internet. 8 Open the USB stick and then double-click GVActivation. 22EDIUS XRE ― User Guide Activation of Serial (Offline) 9 Click [Yes] button. 10Click [OK] button. 11Eject the USB stick from the Windows PC and then insert to the GVRenderEngineService installed PC. 12Click [Offline Activation Register Activation File] button in GV License manager. 13Choose response.XML in the USB stick and then click [Open] button. 14Click [OK] button. 15Activated license will be listed. Close the window by clicking [X] button. EDIUS XRE ― User Guide 23 Section 3 ― Setup Installing the client Install XRE Client on a PC you want to use as an client. POINT •If EDIUS (v 7.0 or later) is not installed on the PC, only XRE Monitor (client mode) will be installed. Note •Close all other application software including resident software before installation. •Before installing the software on your PC, be sure to login with a user ID (such as Administrator) authorized to change system settings. 1 Set your EDIUS XRE Client Installation CD into the drive. Double-click “XREClient_7.xx_xxxx_Setup.exe”. 2 Follow the Setup wizard. 3 Check "Create shortcuts on the desktop.", and then click [Install]. The installation of XRE Client and XRE Monitor (client mode) begins. 4 Select "I want to reboot my computer now.", and then click [Finish]. Your PC is restarted and the installation is complete. 24EDIUS XRE ― User Guide EDIUS XRE Settings Section 4 Before you begin to configure EDIUS XRE, you must establish the network connection between the controller, engine, and client via Ethernet. Note •EDIUS XRE system performs PC-to-PC communications through TCP/IP. Therefore, you must first configure IP addresses and port numbers for the communication. Setting Example In this section, each step is described based on the following system setting example. Controller/Engine PC ¾¾Controller settings (Use a computer name: XREServer1, IP address: 172.25.90.161) Project folder Controller Project Folder (any folder name) on the Server Ex. \\XREServer1\XRE_Controller_Project_ Folder Port 1223 (default) Days to keep jobs in history 30 (default) ¾¾Engine settings Node name Engine1 (any name) Server setting Name XREServer1 (any name) Address "XREServer1" (computer name) or "172.25.90.161" Port 1223 (default) EDIUS XRE ― User Guide 25 Section 4 ― EDIUS XRE Settings Client PC ¾¾XRE Monitor settings (common settings for all clients) Server setting Name XREServer1 (any name) Address "XREServer1" (computer name of the base PC where controller/engine is installed) or "172.25.90.161" Port 1223 (default) Configuring the controller Configuring XREController Configure settings including the location of the "project folder" where rendering job information is saved and port on the PC to be used for EDIUS XRE system. 1 Click the "start" menu, and then click "All Programs"->"Grass Valley"-> "XREAdminConsole". “XREAdminConsole” dialog box XRE Controller Note Set the project folder. •GVRenderEngine and Plug-in are the configuration of the engine. If you have installed both the controller and the engine on a PC, you are able to select GVRenderEngine and Plug-ins on the XREAdminConsole. Configuring the engine ►P31 26EDIUS XRE ― User Guide Configuring XRE Management Server 2 Double-click on the XREController icon. The "XREController setting" dialog box appears. " XREController setting" dialog box Project folder Click [Select...] to specify the location where rendering job information is saved. Port Enter a port number. The default setting value is 1223. Days to keep jobs in history Service Note Set the number of days to keep the history of rendering jobs. The default setting value is 30 days. Open the service setting dialog on Windows •You must specify a port number that is not blocked by the firewall. The firewall is turned off with the standard settings of a base PC. •For a system whose firewall is turned on for operations, the firewall setting must be changed to unblock the desired port number. •The system may not work properly if you specify a port number used by other programs. Therefore, you must specify an unused port number. 3 Select the project folder, and then click [OK]. POINT •Setting the read-only and system attributes to the specified project folder can prevent accidents such as erroneous deletion of the project folder by users. Use the Attrib command at the command prompt to change the folder attribute. Note •The project folder must be specified as a folder that can be referenced from any controller/engine/client PCs and whose address display is always the same in Explorer. EDIUS XRE ― User Guide 27 Section 4 ― EDIUS XRE Settings 4 Set each item, and then click [OK]. Continue to configure XRE Monitor (management mode). Configuring XRE Monitor (management mode) 1 Double-click the XRE Monitor icon on the desktop. Alternative •Click the "start" menu, and then click "All Programs"->"Grass Valley"-> "XREMonitor". 2 Click [Settings]. Alternative •Click "Setting..." on the menu bar. 3 Click the "Settings" tree, and then click "Server setting". 4 Click [Add]. The "Server setting" dialog box appears. 28EDIUS XRE ― User Guide Configuring XRE Management Server " Server setting" dialog box Name Type the name of the controller. Address Enter the computer name or IP address of the PC you want to use as an controller. Port Enter a port number. The default setting value is 1223. Note •You must specify a port number that is not blocked by the firewall. The firewall is turned off with the standard settings of a base PC. •For a system whose firewall is turned on for operations, the firewall setting must be changed to unblock the desired port number. •The system may not work properly if you specify a port number used by other programs. Therefore, you must specify an unused port number. 5 Set each item, and then click [OK]. 6 Click [Apply]. EDIUS XRE ― User Guide 29 Section 4 ― EDIUS XRE Settings POINT •If you want to change any setting, select the server to be changed from "Server setting" list and click [Edit]. •If you want to delete any setting, select the server to be deleted from "Server setting" list and click [Delete]. Continue to configure "Error notification". 7 Click the "Settings" tree, and then click "Error notification". Error notification (management mode) dialog box Error notification setting When making an error, Beep is sounded. Choose either "Notify errors of all jobs" or "No error notification" from the list. If you choose "Notify errors of all jobs", you will be notified of errors related to all rendering jobs instructed by the controller to each engine. *In the XRE Monitor management mode, "Notify errors of my jobs" is disabled. About error notifications ►P44 Check this option to make a beep sound when delivering error notifications. 8 Set each item, and then click [OK]. 30EDIUS XRE ― User Guide Configuring XRE Node Configuring the engine Connection settings to the controller On the PC to be used as an engine, configure the connection settings to the controller. Note •The destination controller must be started beforehand. Configuring the controller ►P26 1 Click the "start" menu, and then click "All Programs"->"Grass Valley"-> "XREAdminConsole". “XREAdminConsole” dialog box GV Render Engine Set the connection to the controller. Plug-ins Set the plug-ins such as Inporter/Exporter and Effects Note •XREController is the configuration of the controller. If you have installed both the controller and the engine on a PC, you are able to select XREController on the XREAdminConsole. Configuring the controller ►P26 2 Double-click on the GVRenderEngine icon. The "GVRenderEngine setting" dialog box appears. EDIUS XRE ― User Guide 31 Section 4 ― EDIUS XRE Settings “GVRenderEngine setting” dialog box Node name Name of the engine. Test Connection test with the controller. Setting Manage the controllers. Service Open the service setting dialog on Windows. 3 Enter the name of the engine in "Node name". By default, the computer name of the PC is entered here. Change the name as necessary. 4 Click [Setting...]. The "Settings" dialog box appears. 5 Click [Add]. The "Server setting" dialog box appears. 32EDIUS XRE ― User Guide Configuring XRE Node “Server setting” dialog box "Server setting" dialog box ►P29 6 Set each item, and then click [OK]. 7 Click [Apply], and then click [OK]. POINT •If you want to change any setting, select the controller to be changed from "Server setting" list and click [Edit]. •If you want to delete any setting, select the controller to be deleted from "Server setting" list and click [Delete]. •To add a destination, repeat steps 5 to 6. 8 Select the controller to be connected, and then click "Connected test". EDIUS XRE ― User Guide 33 Section 4 ― EDIUS XRE Settings The connection is complete if the "Success" message is displayed. 9 Click [OK]. Plug-in settings Configure the plug-in settings as necessary. 1 Double-click on the Plug-ins icon in the XREAdminConsole. The "Plug-in settings" dialog box appears. "Plug-in settings" dialog box 34EDIUS XRE ― User Guide Configuring XRE Client For more information about the plug-in settings, see the EDIUS Reference Manual. Note •It is necessary that the plug-in environments on the EDIUS edit terminals and the controller/engine are all identical. If their plug-in environments are different, an error may occur or your data may not be exported properly. 2 Click the ”Plug-in setting” tree, and then click an item to set. 3 Set each item, and then click [OK]. You can continue to configure other settings by clicking [Apply]. Configuring the client Configuring XRE Monitor (client mode) On the EDIUS edit terminal to be used as an client, configure the connection settings to the controller. The settings are also required when you are using only XRE Monitor on a PC where EDIUS is not installed. Note •The destination controller must be started beforehand. Configuring the controller ►P26 1 Double-click the XRE Monitor icon on the desktop. Alternative •Click the "start" menu, and then click "All Programs"->"Grass Valley"-> "XREMonitor". 2 Click [Settings]. EDIUS XRE ― User Guide 35 Section 4 ― EDIUS XRE Settings Alternative •Click "Setting..." on the menu bar. 3 Click the "Settings" tree, and then click "Server setting". 4 Click [Add]. The "Server setting" dialog box appears. "Server setting" dialog box ►P29 5 Set each item, and then click [OK]. 6 Click [Apply]. POINT •If you want to change any setting, select the controller to be changed from "Server setting" list and click [Edit]. •If you want to delete any setting, select the controller to be deleted from "Server setting" list and click [Delete]. •To add a destination, repeat steps 4 to 5. Continue to configure "Error notification". 7 Click the "Settings" tree, and then click "Error notification". 36EDIUS XRE ― User Guide Configuring XRE Client Error notification (client mode) dialog box Error notification setting From the list, choose the type of errors you will be notified of. If you choose "Notify errors of all jobs", you will be notified of errors related to all rendering jobs instructed by the controller to each engine. If you choose "Notify errors of my jobs", you will be notified of errors related to rendering jobs requested by this Client itself. If you choose "No error notification", no error notification will occur. About error notifications ►P44 When making an error, Beep is sounded. Check this option to make a beep sound when delivering error notifications. 8 Set each item, and then click [OK]. EDIUS XRE ― User Guide 37 EDIUS XRE Operations Note Section 5 •EDIUS XRE system does not work with the remote desktop that comes standard with Windows. •Perform the initial settings of EDIUS XRE in advance according to Section 4 - EDIUS XRE Settings. •The operation to store a rendering job from the previous version of EDIUS to EDIUS XRE which supports EDIUS 7 is not guaranteed. In addition, a rendering job cannot be stored from EDIUS 7 to the previous version of EDIUS XRE. Requesting Rendering Jobs Things to check when creating a project on an client When you edit your EDIUS project file on an client, check the following points. About the destination to save project files The destination to save EDIUS XRE system's project files must be specified as a folder that can be referenced from any controller/engine/ client PCs and whose address display is always the same in Explorer. For details on creating a project file, refer to EDIUS Reference Manual. About the referenced location of sources used for editing Individual clips (source files) to be placed on the timeline must be located in a folder that can be referenced from any controller/engine/ client PCs and whose address display is always the same in Explorer. When storing a rendering job, if offline clips exist (including partial offline clips), the “Restore and transfer clip” dialog box appears. For details on restoring offline clips, refer to EDIUS Reference Manual. 38EDIUS XRE ― User Guide Requesting Rendering Jobs Requesting a rendering job from an client You can request the controller to perform a rendering job when exporting a project edited on an client (each EDIUS edit terminal). Note •Make sure that the controller/engine is started up. Configuring the controller ►P26 Connection settings to the controller ►P31 •While field editing, the rendering job cannot be stored from the project files of both checkout source and destination. 1 Click [Export] in Recorder, and then click "Print to File". The "Print to File" dialog box appears. Alternative •Click "File" on the menu bar, and then click "Export"->"Print to File". •Print to File: [F11] 2 Select an exporter and configure the export setting. For details on exporting to file, refer to EDIUS Reference Manual. 3 Check "XRE" to configure "Server" and "Priority". EDIUS XRE ― User Guide 39 Section 5 ― EDIUS XRE Operations Server Click the list to choose the controller to which your rendering job request will be sent. Priority Choose the priority from "High", "Normal", or "Low" in terms of the order to perform rendering jobs. If you set the higher priority setting, the rendering job will be processed with higher priority. Comment Enter a comment here. POINT •If the name of the controller is not displayed in "Server", configure the controller again. Configuring XRE Monitor (management mode) ►P28 Configuring XRE Monitor (client mode) ►P35 4 Click [Export]. Note •The export operations in EDIUS XRE do not support the "Batch Export" function. 5 Set the exported items. The settings will be different depending on the exporter. 6 Enter the file name, specify the export destination, and then click [Save]. 40EDIUS XRE ― User Guide XRE Monitor Operations Note •The export destination must be specified as a folder that can be referenced from any controller/engine/client PCs and whose address display is always the same in Explorer. Start rendering. The progress of the rendering job can be checked in XRE Monitor. Checking job status ►P41 POINT •You can store preset exporters that contain EDIUS XRE related settings. For details on the preset exporter, refer to EDIUS Reference Manual. XRE Monitor Operations XRE Monitor is software for checking the progress of rendering jobs and job history. If it is started on the controller, the "management mode" is enabled and if it is started on an client, the "client mode" is enabled. The "management mode" allows you to sort the order to perform rendering jobs. Checking job status 1 Double-click the XRE Monitor icon on the desktop. If XRE Monitor is already started and the XRE Monitor icon is in the task tray, right-click on the icon and then click "Open XRE Monitor". Alternative •Click the "start" menu, and then click "All Programs" ->"Grass Valley"-> "XREMonitor". EDIUS XRE ― User Guide 41 Section 5 ― EDIUS XRE Operations " XRE Monitor" dialog box (3) (4) (5) (6) (7) (8) (9) (10) (11) (17) (1) (12) (2) (13) (14) (15) (16) (1) Menu bar (2) Restart* The menu bar also allows you to perform the operations from (2) to (11) in the table. Click this button to restart a job after selecting a paused or stopped job from the "Job List (above)". (3) Pause* Pauses the job you selected from the "Job List (above)". (4) Stop* Stops the job you selected from the "Job List (above)". (5) Cancel* Cancels the job you selected from the "Job List (above)". The canceled job will move to the "Job List (below)". (6) Retry* Performs the job you selected from the "Job List (below)" again. (7) Property Shows the properties of the job you selected from the "Job List (above)" or "Job List (below)". Checking job properties ►P45 Change job order (8) (management mode only) Turns on/off the job sorting. Sorting the order to perform jobs in XRE Monitor (management mode) ►P46 42EDIUS XRE ― User Guide XRE Monitor Operations Up (9) (management mode only) Moves up the order to perform the job you selected from the "Job List (above)". Sorting the order to perform jobs in XRE Monitor (management mode) ►P46 Down (10) (management mode only) Moves down the order to perform the job you selected from the "Job List (above)". Sorting the order to perform jobs in XRE Monitor (management mode) ►P46 (11) Settings Configure settings in "Server setting" and "Error notification". Configuring XRE Monitor (management mode) ►P28 Configuring XRE Monitor (client mode) ►P35 (12) Server The currently connected controller is displayed. Clicking the list shows the list of the controllers stored as destinations, which allows you to switch the controller to check job status. (13) Job List (above) Shows the active jobs and jobs waiting to be performed. Choose the job history types to be shown. To show all of the job history, click both of them. (14) Error / Info Error Click this to show only jobs in which errors occurred. Info Click this to show jobs in which no error occurred (successful and canceled ones). (15) Search Enter a keyword to narrow down the search result of the "Job List (below)". (16) Job List (below) Shows the history of the performed jobs. A successful job is shown with , a job in which an error occurred is shown with , and a canceled job is shown with . The number of days to keep the history can be configured on the XRE Management Server. Configuring the controller ►P26 (17) Close Closes the "XRE Monitor" dialog box. **In the client mode, only the operations for jobs requested by the client EDIUS XRE ― User Guide 43 Section 5 ― EDIUS XRE Operations itself are enabled. POINT •If "Change job order" is turned off, every click on an item name in the "Job List (above)" can sort the rendering jobs in ascending or descending order. Sorting is not available if "Change job order" is turned off. Sorting is available in the "Job List (below)" whether "Change job order" is turned on or off. •Displayed items can be customized. Right-click on an item name, and then check the item(s) to display. About error notifications If an error occurs during a rendering process, each PC will be notified of the error through XRE Monitor. An error message appears near the task tray. If you click the error message, it disappears. POINT •You can check the type of errors you will be notified of and change it. Configuring XRE Monitor (management mode) ►P28 Configuring XRE Monitor (client mode) ►P35 •You will not be notified of error details. You can check them in the "Job List (below)" of the "XRE Monitor" dialog box. A job in which an error occurred is shown with . "XRE Monitor" dialog box ►P42 44EDIUS XRE ― User Guide XRE Monitor Operations Checking job properties 1 Select a job from the "Job List (above)" or "Job List (below)", and then click [Property]. Alternative •Select a job from the "Job List (above)" or "Job List (below)", and then click "Action"->"Property" from the menu bar. •Select a job from the "Job List (above)" or "Job List (below)", right-click on it, and then click "Property". •Double-click a job in the "Job List (above)" or "Job List (below)". "Job Properties" ¾¾"General" tab EDIUS XRE ― User Guide 45 Section 5 ― EDIUS XRE Operations POINT •You can configure the "Job Name", "Priority", and "Comment" settings for a job in the "Job List (above)". •In XRE Monitor (management mode), you can change the "Job Name", "Priority", and "Comment" settings for all jobs. On an client, you can only change the "Job Name", "Priority", and "Comment" settings for jobs requested by the client itself. •Properties of a job in the "Job List (below)" cannot be changed. When viewing properties of a job in the "Job List (below)", "History" appears in the dialog box caption. ¾¾ "Details" tab You can view the properties of the next upper or lower job from the currently displayed one by clicking or . Sorting the order to perform jobs in XRE Monitor (management mode) Note •The order to perform jobs cannot be sorted in XRE Monitor (client mode). 1Click "Change job order" to turn it on. Every click switches on and off. If it is turned on, job sorting is enabled. If it is turned off, sorting operations are disabled and the icon is displayed with a diagonal line. Ex. When turned off: 46EDIUS XRE ― User Guide XRE Monitor Operations POINT •If job sorting is enabled, jobs are sorted by the order in which they are performed. Alternative •Click "Action"->"Change job order" from the menu bar. A check mark appears if job sorting is enabled. •Right-click on a job in the "Job List (above)" or "Job List (below)", and then click "Change job order". A check mark appears if job sorting is enabled. 2 Select a job from the "Job List (above)", and then click either [Up] or [Down]. Alternative •Select a job from the "Job List (above)", and then click "Action"->"Up" or "Down" from the menu bar. •Select a job from the "Job List (above)", right-click on it, and then click "Up" or "Down". •Select a job from the "Job List (above)", and then drag and drop the job in the upper or lower direction. EDIUS XRE ― User Guide 47 Section 5 ― EDIUS XRE Operations Troubleshooting Section 6 If any rendering job does not start, check the following items: Has the controller and engine been running? Configuring the controller ►P26 Configuring the engine ►P31 Are your source files located on a network-connected PC (not a local PC)? Things to check when creating a project on an client ►P38 Is the same server selected on the client and engine? (If more than one controller is stored.) Connection settings to the controller ►P31 Configuring XRE Monitor (client mode) ►P35 48EDIUS XRE ― User Guide EDIUS XRE ― User Guide 49 Printed in Japan
© Copyright 2026 ExpyDoc