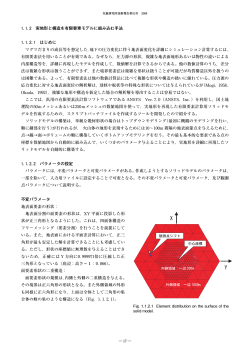
Geschäftsbereich IT h Auc sche t deu vors l a sion Ver anden h Ownership | Business Function IT, Charité | Networks Dept. | Tel. +49 30 450 575 444 | Fax +49 30 450 570 962 | [email protected] | Rev. 2.0 | Latest update: 1/2017 | Translation: Farina Boltersdorf OpenVPN using Windows (10, 8, 7) The Charité VPN service is based on the OpenVPN that is available for a multitude of operating systems. The following instructions take you through the installation and start-up phase of the software system using Windows 10. Older versions of Windows (i.e. Vista or XP) are no longer supported. Downloading the Programme and Installation After your VPN request has been processed, you will receive a confirmation mail with various links to software and documentation. Users without a Charité mail account will first have to set a password in the password front end (https://zugang.charite.de). Only then can you use the VPN service. You can not install OpenVPN by yourself on Charité’s centrally administered PCs. Call the IT Helpdesk and request assignment of the OpenVPN software. At first download the the most recent version of OpenVPN software onto your computer. Use your favorite web browser (Internet Explorer, Firefox or Chrome) to open the OpenVPN page http:// Fig. 1 OpenVPN Homepage www.openvpn.net, fig 1. Click the area named Com- munity. From the navigation menu choose the link Downloads. On the download page you will find various versions, the latest is at the top of the list. Select the most recent version (current in Feb. 2017: OpenVPN 2.4) and download Installer Windows Vista or later, fig. 2. Click Ausführen (Run) to confirm to continue. The installation follows directly after downloading. Fig. 2 Load OpenVPN software CHARITÉ - UNIVERSITÄTSMEDIZIN BERLIN Eine gemeinsame Einrichtung der Freien Universität Berlin und der Humboldt-Universität zu Berlin OpenVPN using Windows (10, 8, 7) – Page 2/4 Geschäftsbereich IT You will first receive a warning from the User Account Control (UAC) that is to be answered with Ja (Yes), fig.3. Ownership | Business Function IT, Charité | Networks Dept. | Tel. +49 30 450 575 444 | Fax +49 30 450 570 962 | [email protected] | Rev. 2.0 | Latest update: 1/2017 | Translation: Farina Boltersdorf Fig. 3 User account control warning Setup Wizard is activated and will lead you through the installation steps, fig. 4. Another warning for the installation of the device driver will pop up which you have to confirm by clicking Installieren (Install), fig. 5. Attention: by default Installieren (Install) is not selected. Fig. 5 Warning for TAP device driver installation Fig. 4 OpenVPN Install Wizard To complete the installation you have to install the configuration file, which also includes your personal certificate, for the Charité connection. You received the file in a separate email from the VPN staff. Store the attachment on the desktop. Use the Explorer to move the file from the desktop into a folder already created by OpenVPN. The path to the folder is C:\Programme\OpenVPN\config. Once you have dragged the file to the config folder it should correspond to fig. 6. Fig. 6 OpenVPN config folder OpenVPN using Windows (10, 8, 7) – Page 3/4 Geschäftsbereich IT Ownership | Business Function IT, Charité | Networks Dept. | Tel. +49 30 450 575 444 | Fax +49 30 450 570 962 | [email protected] | Rev. 2.0 | Latest update: 1/2017 | Translation: Farina Boltersdorf Setting Up OpenVPN / Working with the Charité Network The OpenVPN GUI can be started using the Windows start menu or the link on the desktop which was created during the installation process. In contrast to earlier versions you don’t have to explicitely start OpenVPN by Programm als Administrator ausführen (Run as administrator). This is now default. The resulting programme start is really quite unspectacular; simply an icon showing a grey screen with a lock appears in the taskbar, fig. 7. Attention: sometimes the icon is hidden behind a collection symbol, the triangle. To connect to the Charité net right click on the icon in the taskbar and then on Verbinden (Connect) in the drop-down menu, fig. 8. Should the item be absent in the drop- Fig. 7 OpenVPN GUI Symbol im Infobereich oder ausgeblendet Fig. 8 OpenVPN GUI verbinden down menu, the configuration file is not found in the config folder – as shown in fig. 6. The Aktueller Status (Current State) window opens and displays the connection steps. This is the most important information for the VPN advisors ([email protected]) in case of problems. In addition, the Benutzer Authentifizierung (User Authentication) window opens where you enter your user name (as received per e-mail) and password (Charité mail passwort resp. as defined in the password portal), fig. 9. During the login process the VPN icon in the taskbar is yellow; if your login is accepted an information popup shortly appears and the color of the icon changes to green, fig. 10. The Aktueller Status (Current State) window can be directly opened to check the successful connection, or in the case of an error, copied and sent as an Fig. 9 OpenVPN Benutzername und Passwort e-mail to the VPN advisors. To do this, right click on the OpenVPN icon in the taskbar and then click on Log Information in the drop-down menu. After establishing the connection you should check all settings done correct. https://vpntest.charite.de provides a one-stop web service to check if the VPN connection is working properly. Three green dots indicate a fully operational VPN, fig. 11. In case of errors you’ll bei given hints on what might be wrong and how to fix it. Users without a Charité mail account will in general get a red dot on test #3 due to their missing authorization for using Charité proxy. Fig. 10 Verbindungsaufbau und Fertigmeldung Fig. 11 Webseite http://vpntest.charite.de OpenVPN using Windows (10, 8, 7) – Page 4/4 Geschäftsbereich IT Using the Charité proxy while connected via OpenVPN Ownership | Business Function IT, Charité | Networks Dept. | Tel. +49 30 450 575 444 | Fax +49 30 450 570 962 | [email protected] | Rev. 2.0 | Latest update: 1/2017 | Translation: Farina Boltersdorf Please remember you have to use the Charité Proxy –as long as there is an OpenVPN connection. Current Windows versions will search for a proxy by default, so test #3, fig. 11, will be successful. Important hint: The browser is retrieving the autmatic proxy configuration on startup only. This means that you need to restart the browser after connecting or disconnecting from the VPN! Fig. 12 Windows Settings If the option automatic proxy connection is yet not configured, proceed as follows: Open Settings from the Windows menu, fig. 12. In the Settings window choose the category Netzwerk und Internet (Network & Internet). Then click Ethernet and choose Internetoptionen (Internet options) on the right, fig. 13. When the next window appears, fig. 14, click LAN Einstellungen (LAN settings) and check the box Einstellungen automatisch erkennen, fig. 15. All other options should be unchecked. If you use Mozilla Firefox, the corresponding option is Die ProxyEinstellungen für dieses Netzwerk automatisch erkennen and can be found in the Extras menu under Einstellungen ➙ Erweitert➙ Netzwerk ➙ Verbindung Fig. 13 Network & Internet Fig. 14 Internet options Fig. 15 LAN settings
© Copyright 2026 ExpyDoc