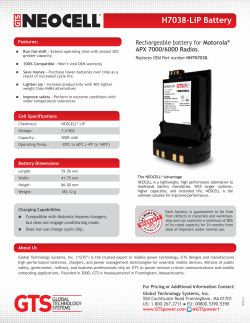
TC55
QUICK START GUIDE
Features
Receiver
LED
Light/Proximity
Sensor
Touch Screen
Programmable
Button
Volume Control
Programmable
Button
Microphone
Charging
Contacts
Speaker
Battery Cover
NFC
Antenna
Camera
Battery Cover
Notch
Exit Window
(Optional)
USB Connector
Microphone
Headset Jack
Unpacking
The following items are in the box:
•
•
•
•
•
TC55
Lithium-ion battery (2,940 or 4,410 mAh)
Charging Cable
Quick Start Guide
Regulatory Guide.
Power Button
Flash
Installing the SIM Card
NOTE The TC55 accepts full size SIM cards. If using micro or nano SIM cards, a
third-party adapter is required.
CAUTION For proper electrostatic discharge (ESD) precautions to avoid
damaging the SIM card. Proper ESD precautions include, but not
limited to, working on an ESD mat and ensuring that the user is
properly grounded.
1.
2.
3.
Slide the SIM card holder toward the bottom of the TC55 to unlock.
Lift the SIM door.
Insert the SIM card with the cut edge and the contacts facing up.
4.
5.
Close the SIM card holder.
Slide the SIM card holder toward the top of the TC55 to lock into place.
Installing an Optional microSD Card
NOTE Supports up to 32 GB cards.
CAUTION For proper electrostatic discharge (ESD) precautions to avoid
damaging the SD card. Proper ESD precautions include, but not
limited to, working on an ESD mat and ensuring that the user is
properly grounded.
1.
2.
Slide the microSD card door toward the top of the TC55 to unlock.
Lift the SD card door.
Card Notch
3.
4.
5.
6.
Align the microSD card with the card holder. Ensure that the contacts on the
card are facing down and toward the card holder. Note the position of the card
notch.
Insert the microSD card into the card holder.
Close the SD card door.
Slide the SD card door toward the bottom of the TC55 to lock into place.
Installing the Battery
1.
2.
Align the three tabs on the bottom of the battery with the three slots in the
battery compartment.
Press the battery down and then rotate until it locks into place.
2,940 mAh
3.
4.
4,410 mAh
Align the battery door with the back of the device and press the battery door
down until it snaps into place.
Ensure that the battery door is seated properly and that no gaps are present.
Charge the TC55
NOTE Do not connect the Charge Cable to the USB port of a host computer. The
TC55 will not charge from the host computer using the Charge Cable. See
TC55 User Guide for more information.
1.
2.
3.
Connect the Charge Cable Cup to the bottom the TC55.
Connect the USB connector to the power supply port.
Plug the power supply into an AC outlet.
4.
The TC55 starts to charge automatically. The 2,940 mAh battery charges in
approximately three hours and the 4,410 mAh battery charges in approximately
4.5 hours.
LED
Description
Slow Flashing Green
TC55 is charging.
Solid Green
TC55 is fully charged.
Fast Flashing Red
Charging error.
Off
Not charging.
Turning On the TC55
Press the Power button for at least one second to turn on the TC55.
Replacing the 2,940 mAh Battery
To replace the 2,940 mAh battery:
1.
2.
3.
4.
Press the Power button until the menu displays.
Touch Power off.
Touch OK.
Place thumbnail at battery cover notch and lift the battery cover.
5.
Pull the battery tab down at a 45° angle.
6.
7.
Remove the battery out of the battery compartment.
Align the three tabs on the bottom of the replacement battery with the three slots
in the battery compartment.
Press the battery down and rotate until it locks into place.
8.
9.
Align the battery door with the back of the device and press the battery door
down until it snaps into place.
10. Ensure that the battery door is seated properly and that no gaps are present.
11. Press the Power button to turn on the TC55.
Replacing the 4,410 mAh Battery
To replace the 4,410 mAh battery:
1.
2.
3.
4.
Press the Power button until the menu displays.
Touch Power off.
Touch OK.
Place thumbnail at battery cover notch and lift the battery cover.
5.
With two fingers, press the battery down.
6.
7.
Rotate the battery out of the compartment.
Align the three tabs on the bottom of the replacement battery with the three slots
in the battery compartment.
Press the battery down and rotate until it locks into place.
8.
9.
Align the battery door with the back of the device and press the battery door
down until it snaps into place.
10. Ensure that the battery door is seated properly and that no gaps are present.
11. Press the Power button to turn on the TC55.
Data Capture
To capture bar code data using the linear imager (on optional configurations):
1.
2.
Open an application and ensure that a text field is in-focus.
Press and hold the programmable button. The LED lights red to indicate that
data capture is in process.
3.
Place the red aiming pattern across the bar code. The LED lights green and a
beep sounds, by default, to indicate the bar code was decoded successfully.
The captured data appears in the text field.
Programmable Button
4.
To capture bar code data using the camera:
1.
2.
Open an application and ensure that a text field is in-focus.
Press and hold the programmable button. A preview window appears and the
LED lights red to indicate that data capture is in process.
Programmable Button
3.
4.
5.
Move the TC55 until the bar code is centered under the red target.
The LED lights green and a beep sounds, by default, to indicate the bar code
was decoded successfully.
The captured data appears in the text field.
Get More Information
For more information refer to the TC55 User Guide on the TC55. Touch
User Guide to open the guide.
> TC55
Also go to http://supportcentral.motorolasolutions.com to view the TC55 User Guide and
TC55 Integrator Guide.
Motorola reserves the right to make changes to any product to improve reliability,
function, or design.
Motorola does not assume any product liability arising out of, or in connection with, the
application or use of any product, circuit, or application described herein.
No license is granted, either expressly or by implication, estoppel, or otherwise under
any patent right or patent, covering or relating to any combination, system, apparatus,
machine, material, method, or process in which Motorola products might be used. An
implied license exists only for equipment, circuits, and subsystems contained in
Motorola products.
Motorola Solutions, Inc.
1301 E. Algonquin Rd.
Schaumburg, IL 60196-1078, U.S.A.
http://www.motorolasolutions.com
MOTOROLA, MOTO, MOTOROLA SOLUTIONS and the Stylized M Logo are
trademarks or registered trademarks of Motorola Trademark Holdings, LLC and are
used under license. All other trademarks are the property of their respective owners.
© 2013 Motorola Solutions, Inc. All Rights Reserved.
MN000014A01 Revision C - September 2013
© Copyright 2026 ExpyDoc