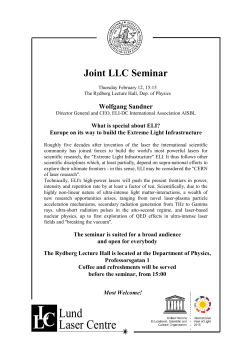
Instructions for Use
Laser Induced Fluorescence
(LIF) Detector Manual
LIF Instructions for Use
PN 718113AF
January 2014
Beckman Coulter, Inc.
250 S. Kraemer Blvd.
Brea, CA 92821 U.S.A.
Laser Induced Fluorescence (LIF) Detector Manual
LIF Instructions for Use
PN 718113AF (January 2014)
© 2012-2014 Beckman Coulter, Inc.
All rights reserved. Made in U.S.A.
No part of this document may be reproduced or
transmitted in any form or by any means, electronic,
mechanical, photocopying, recording, or otherwise,
without prior written permission from
Beckman Coulter, Inc.
Beckman Coulter and the stylized logo are trademarks of
Beckman Coulter, Inc. and are registered in the USPTO.
All other trademarks, service marks, products, or services
are trademarks or registered trademarks of their
respective holders.
Find us on the World Wide Web at:
www.beckmancoulter.com
Printed in U.S.A.
Revision History
This document applies to the latest software listed and higher versions. When a subsequent software
version changes the information in this document, a new issue will be released.
Revision AF, 01/2014
PN 718113AF
iii
Revision History
iv
PN 718113AF
Safety Notice
Read all product manuals and consult with Beckman Coulter-trained personnel before attempting
to operate instrument. Do not attempt to perform any procedure before carefully reading all
instructions. Always follow product labeling and manufacturer’s recommendations. If in doubt as
to how to proceed in any situation, contact your Beckman Coulter Representative.
Alerts for Danger, Warning, Caution, Important, and Note
WARNING
WARNING calls attention to a condition or possible situation that could cause
injury to the operator.
CAUTION
CAUTION calls attention to a condition or possible situation that could damage or
destroy the product or the operator’s work.
IMPORTANT IMPORTANT is used for comments that add value to the step or procedure being performed.
Following the advice in the Important adds benefit to the performance of a piece of equipment or to a
process.
NOTE NOTE is used to call attention to notable information that should be followed during installation, use,
or servicing of this equipment.
High Voltage Danger
This symbol indicates the potential of an electrical shock hazard existing from a high voltage
source, and that all safety instructions should be read and understood before proceeding with the
installation, maintenance, and servicing of all modules.
Do not remove system covers. To avoid electrical shock, use supplied power cords only and connect
to properly grounded (three-hole) wall outlets. Do not use multi-plug power strips.
PN 718113AF
v
Safety Notice
Laser Light
Laser Light
This symbol indicates that a potential hazard to personal safety exists from a laser source. When
this symbol is displayed in this manual, pay special attention to the specific safety information
associated with the symbol.
Laser Specifications
Laser Type
Class IIIa Laser Diode
Maximum Output
3 mW
Wavelength
635 nm
Laser Type
Class IIIb Argon-Ion Laser (air-cooled)
Maximum Output
3 mW
Wavelength
488 nm
Cautions and Warning Found in this Manual
Please read and observe all warnings and instructions. Remember, the user is the most important
key to safety; operate this equipment with care.
CAUTIONS and WARNINGS found within this document are listed below.
WARNING
The instrument user may be able to select a laser device which may NOT have a
power interrupt relay. The non-presence of a power-interrupt relay may defeat
some of the Instrument safety interlock devices.
WARNING
Automated equipment can move without warning during operation. Keep hands
and body away from moving components on the instrument.
vi
PN 718113AF
Safety Notice
FCC Class A Compliance
CAUTION
Do not attempt to load or remove labware manually while the instrument is in
operation.
WARNING
Do not spill liquids on or around the instrument. Wipe up any spills immediately.
WARNING
To avoid serious damage to the instrument, make sure that the laboratory site
voltage/frequency matches the voltage/frequency that was ordered for the
instrument.
WARNING
Do not attempt to remove or replace covers while the unit is powered on;
disconnect power before removing or replacing the cover.
WARNING
Avoid direct exposure to the laser beam. Never look directly into the laser beam,
and never leave the laser on, open, and unattended.
FCC Class A Compliance
This equipment has been tested and found to comply with the limits for a Class A digital device,
pursuant to Part 15 of FCC Rules. These limits are designed to provide reasonable protection against
harmful interference when the equipment is operated in a commercial environment. This
equipment generates, uses, and can radiate radio frequency energy and, if not installed and used in
accordance with the instruction manual, may cause harmful interference to radio communications.
Operation of this equipment in a residential area is likely to cause harmful interference in which
case the user will be required to correct the interference at his own expense.
EMI Compliance
THIS DIGITAL APPARATUS DOES NOT EXCEED THE CLASS A LIMITS FOR THE RADIO NOISE
EMISSIONS FROM DIGITAL APPARATUS AS SET OUT IN THE RADIO INTERFERENCE REGULATIONS
OF THE CANADIAN DEPARTMENT OF COMMUNICATIONS.
PN 718113AF
vii
Safety Notice
EMI Compliance
viii
PN 718113AF
Contents
Revision History, iii
Safety Notice, v
Alerts for Danger, Warning, Caution, Important, and Note, v
High Voltage Danger, v
Laser Light, vi
Laser Specifications, vi
Cautions and Warning Found in this Manual, vi
FCC Class A Compliance, vii
EMI Compliance, vii
Laser Induced Fluorescence Detection, 1
Specifications, 1
System Overview — LIF System, 2
The LIF Detector, 2
Component Description, 2
The Laser Modules, 3
488 nm Argon Ion Laser Module, 4
635 nm Laser Module, 5
Using Other Lasers with the LIF Detector, 5
Optical System, 6
Installation, 8
Preinstallation Requirements, 8
Bench Space, 9
Installing the Interconnect Module, 9
Connecting the Laser Cable(s) to the Interconnect Module, 9
Installing the LIF Detector Module, 11
Installing Filters in the Filter Housing, 11
Installing the Filter Housing into the Detector, 13
Installing the LIF Detector into the Instrument, 14
Preparing the Cartridge for LIF Usage, 14
Connecting the Probe to the Cartridge, 15
Operation, 17
ix
Contents
Preparation, 17
Configuring 32 Karat for LIF Operation, 18
Direct Control, 22
Laser Control, 22
Time Program, 23
Dynamic Range, 23
Calibration Correction Factor, 24
Calibration Wizard, 26
Calibration Wizard – Step 1, 27
Calibration Wizard – Step 2, 28
Calibration Wizard – Step 3, 30
Calibration Wizard – Step 4, 31
Manual Mode, 32
Care and Maintenance, 32
Introduction, 32
Inspecting the System, 32
Cleaning, 33
Storage, 33
x
Illustrations
Illustrations
1
Instrument with LIF Detector, 3
2
488 nm Laser Module Back Panel, 5
3
LIF Optical System (Rotated 90° counterclockwise), 7
4
Optical Diagram, 8
5
Installing the Interconnect Module, 10
6
Installing Filters in the Filter Housing, 12
7
Installing the Filter housing into the LIF Detector, 13
8
Installing the LIF Plug and Probe Stabilizer, 15
9
Connecting the Probe to the LIF Cartridge, 16
10
Main Menu, 18
11
Configure Instrument menu command, 19
12
Choosing the Type of Instrument, 19
13
Confirmation, 20
14
Choosing the LIF Detector, 20
15
Configuring the LIF Detector, 21
16
Direct Control Screen, 22
17
Laser Control Screen, 22
18
LIF Detector Initial Conditions Screen, 23
19
Electropherograms (A, B) with different Dynamic Ranges, 24
20
Accessing the LIF Calibration Wizard, 27
21
Calibration Wizard – Step 1, 28
22
Calibration Wizard – Step 2, 29
23
Calibration Wizard – Step 3, 30
24
Calibration Wizard Running Screen, 31
25
Calibration Wizard – Step 4 Screen, 31
26
Calibration Wizard – Manual Mode, 32
xi
Tables
Tables
1
xii
LIF Detection Specifications, 1
Laser Induced Fluorescence Detection
Specifications
Table 1 LIF Detection Specifications
Specification
Value
Relative Fluorescence Units (RFU) range
0 to 1000 RFU
Dynamic Range (at a dynamic range setting of 1000)
> 104
Sensitivity
1 ´ 10-11M Sodium Fluorescein with a
signal-to-noise ratio ≥ 2
Baseline Noise
< 0.005 RFU peak to peaka
Baseline Drift
< 0.2 RFU per houra
488 nm Laser Module Dimensions
Height
25.00 in. (63.5 cm)
Width
10.25 in. (26.3 cm)
Depth
14.25 in. (36.0 cm)
635 nm Laser Module Dimensions (Discontinued)
Height
7.5 in. (19.2 cm)
Width
5.25 in. (13.2 cm)
Depth
7.0 in. (17.7 cm)
Wavelength Ranges (for optics)
Excitation
300 to 700 nm
Emission
350 to 750 nm
Filters (optional)
520 nm bandpass filter
488 nm notch filter
675 nm long pass filter
Fiber cable length
6 feet (1.83 m)
Software compatibility
Instrument software, Version 2.0 or later
Laser (optional)
3 mW 488 nm (air-cooled) Argon Ion Laser
635 nm Diode Laser
PN 718113AF
1
Laser Induced Fluorescence Detection
System Overview — LIF System
Table 1 LIF Detection Specifications (Continued)
Specification
Value
Power requirements
100/120V, 12A, 50/60 Hz
or 220/240V, 6A, 50/60 Hz
Ambient Temperature Operating Range
15 to 40°C (39 to 104°F)
Recommended Best Performance Range
15 to 30°C (59 to 86°F)
Relative Humidity
<95% non-condensing @ 35°C (121°F)
a. These specifications are for a 75 mm I.D. capillary.
System Overview — LIF System
The LIF system consists of an instrument, along with the LIF Detector module, the LIF Interconnect
Module, and a Laser Module. Refer to Figure 1 for more information. A regular instrument capillary
cartridge with a LIF Detector plug installed is required for use with this system. The system requires
the instrument software, version 2.0 or later.
The LIF Detector
The Laser Induced Fluorescence (LIF) Detector is available as an optional accessory. The LIF detector
uses a laser light source. A 488 nm argon-ion laser is available from Beckman Coulter. Other lasers
can be adapted. Refer to the section titled Using Other Lasers with the LIF Detector for more
information. A fiber cable transmits excitation light from the laser to the capillary in the cartridge.
Substances in the capillary which fluoresce at the laser wavelength are detected. The LIF Detector
measures and records this fluorescence, which appears as a peak in the software.
The initial installation of the LIF Detector must be performed by a Beckman Coulter Field Service
Engineer. The instrument can easily be converted between LIF and UV/PDA modes as detector
components are modular.
The LIF Detector can be used in the indirect mode. In this mode, a fluorescent buffer system is used
to detect non-fluorescing components.
Component Description
The laser is used as the excitation source. The Interconnect Module is used to connect the laser to
the instrument. A fiber optic cable and probe directs the laser light to the capillary. The LIF
cartridge plug focuses the emitted light into the LIF Detector Module. The LIF detector collects the
fluorescence emissions and converts it into an output signal. Filters are installed in the detector
filter housing to correspond with the lasers and chemistry being used with the system.
2
PN 718113AF
Laser Induced Fluorescence Detection
System Overview — LIF System
Figure 1 Instrument with LIF Detector
1
2
3
4
PWP
UV
HV +
HV -
LASER ON
CURRENT LIMIT
I
O
5
LASER ON
CURRENT LIMIT
I
O
BECKMAN
P/ACE SYSTEM
LASER MODULE 488
900708L.AI
1. Cartridge Cover
2. LIF Interconnect Module
3. 488 nm Laser Module
4. LIF Detector Module
5. 635 nm Laser Module (Discontinued)
The Laser Modules
The following section describes the optional 488 nm and 635 nm laser modules, and how they
interface with the instrument and the LIF Detector. A complete set of laser operating instructions
are also provided in this document.
PN 718113AF
3
Laser Induced Fluorescence Detection
System Overview — LIF System
WARNING
During normal operation of the LIF Detector, laser light is not accessible to the
user. To prevent potentially harmful laser light from being emitted from the end
of the fiber cable, an interlock mechanism turns off the laser if the laser fiber cable
is disconnected from the interconnect module, or if the cartridge cover is opened.
Always power off the laser module and instrument before removing any of the LIF
system module(s).
If these precautions should be defeated and the beam becomes accessible,
DO NOT look into the beam or direct it toward someone else.
488 nm Argon Ion Laser Module
The Beckman Coulter 488 nm laser is an air-cooled Argon Ion Laser. Two indicator lights are located
on the front of the 488 nm Laser Module. Refer to Figure 1 for more information. The green light
flashes to indicate that the interlock circuit is complete and the laser is preparing to light (in
approximately 40 seconds). Once the laser is operating, the green light will stay on continuously
until the laser is turned off, the cartridge cover opened, or until the fiber cable coupler is
disconnected from the LIF Interconnect Module.
The yellow light is a current limit indicator. A sensor in the laser module measures the amount of
laser light being produced. Circuits in the laser module adjust the amount of current being drawn
to maintain a stable 3mW output. When the laser tube is new, a fairly low current easily produces
3mW; as the laser tube ages, increasingly more current is needed to maintain the 3mW output.
The yellow indicator light will come on when the system begins to draw more than 7A of current.
This light indicates that the laser tube should be replaced; when it comes on, contact
Beckman Coulter Customer Service for assistance. Laser tube life should be longer than 2,000 hours.
4
PN 718113AF
Laser Induced Fluorescence Detection
System Overview — LIF System
Figure 2 488 nm Laser Module Back Panel
635 nm Laser Module
IMPORTANT This laser is discontinued and is no longer supported by Beckman Coulter.
The power switch is located on the back panel of the 635 nm laser housing. However, the laser will
not light up unless the instrument is on, and all doors and interlocks are in place. A red light on the
front panel of the 635 nm laser module indicates that the laser is on.
Using Other Lasers with the LIF Detector
Laser units other than the Beckman Coulter Laser Modules 488 and 635 can be used with the
LIF detector, as long as the guidelines below are strictly followed.
• If you purchased your LIF detector without a Beckman Coulter Laser Module, an Interlock/Fiber
Optic cable (P/N 360671) will have been provided. The custom interlock connector plugs into
the LIF Interconnect Module. The fiber optic termination of the cable is the standard SMA 905.
Your laser unit must be fitted with a fiber launcher which is compatible with this connector.
The two electrical wires in the cable connect to the interlock switches inside the detector and
instrument. These switches close when it is safe for the laser to come on. These wires must be
PN 718113AF
5
Laser Induced Fluorescence Detection
System Overview — LIF System
connected to your laser’s interlock circuit. The connectors and switches in the detector are rated
for low voltage (TTL level) signals.
CAUTION
To avoid damaging the interlock connector and switches in the LIF Detector
Module, do not connect interlock wires in the laser unit to a voltage greater than
the rated voltage of the interlock connector and switches (5V, 0.1 A).
U.S. Federal regulations require that this connection be made to limit access to
laser energy when the cable is disconnected from the LIF Interconnect Module.
Optical System
Refer to Figure 3 for a schematic overview of the LIF Detector optical diagram. Fiber optic cables
carry laser light from the laser(s) through the interconnect module to the capillary window. When
a fluorescent component passing through the capillary reaches the illuminated area, it emits light
in all directions. This fluorescence is collected by a spherical reflector in the probe and a modified
ball lens in the LIF Detector plug. The collected fluorescent light is split by a beam splitter and
imaged onto two photomultiplier tubes, one for each channel. (For a single wavelength LIF
detector, no beam splitter is present and the collected fluorescent light is imaged directly onto one
photomultiplier tube).
6
PN 718113AF
Laser Induced Fluorescence Detection
System Overview — LIF System
Figure 3 LIF Optical System (Rotated 90° counterclockwise)
7
9
1
8
2
5
6
10
3
4
900726L.AI
PN 718113AF
1. Laser 1
6. Beam Splitter (50/50)
2.
3.
4.
5.
7. Photomultiplier Tube #2 (DETECTOR #2)
8. Laser Filters (Notch Filters)
9. Emission Filters
10. Photomultiplier Tube #1 (DETECTOR #1)
Spherical Mirror
Laser 2
Capillary
Ball Lens
7
Laser Induced Fluorescence Detection
Installation
Figure 4 Optical Diagram
1. Collimated Collected Beam To Detector
2. Modified 5mm Dia. Sapphire lens
(R1 and R2 = 2.5 mm)
3. Cross Section of the Capillary
4. Spherical Reflector
5.
6.
7.
8.
Excitation Fiber for Laser #1
Excitation Fiber for Laser #2
Plug
Probe
Installation
WARNING
Be sure to power down the instrument before proceeding with component
installation.
Preinstallation Requirements
Initial installation, which will be done by a Beckman Coulter Field Service Engineer, involves setting
up the laser, connecting it to the LIF Detector System, and verifying proper system operation
(including operation of the laser interlock system, which prevents the user from exposure to
laser light). The LIF Detector requires software and instrument firmware version 2.0 or later.
8
PN 718113AF
Laser Induced Fluorescence Detection
Installation
Bench Space
The instrument and the laser require an area of approximately four feet by two feet. Allow adequate
space between instruments for air circulation (6 inch minimum). Additional space is required for a
computer, printer, and other optional equipment, if applicable. Leave adequate space around the
laser for air circulation.
CAUTION
Some laser modules produce significant quantities of heated air. Position these
lasers so that this heated air is not drawn into the instrument.
Installing the Interconnect Module
WARNING
Be sure to power down the instrument before proceeding with component
removal or installation.
If previously installed, remove the UV or PDA detector from the upper-right corner of the
instrument. Carefully install the Interconnect Module in the upper-right corner. Secure the module
by tightening the locking screw, located in the front lower middle area of this module, finger-tight.
Connecting the Laser Cable(s) to the Interconnect Module
Pull back the interlock cover, as shown in Figure 5. Hold the cable securely, and screw the fastener
into the Interconnect Module. It is important not to allow either cable to become twisted during
installation, as this may damage the fiber optic line inside the cable. Finally, install the interlock
cover as shown in Figure 5.
PN 718113AF
9
Laser Induced Fluorescence Detection
Installation
Figure 5 Installing the Interconnect Module
1. Probe Holder
2. Fiber Optic Connector
10
3. Interlock Connector
4. Interlock Cover
PN 718113AF
Laser Induced Fluorescence Detection
Installation
Installing the LIF Detector Module
Prior to installing the LIF Detector, install the filter(s) and filter housing.
Installing Filters in the Filter Housing
The filter housing, which is inserted in the right side of the LIF Detector, has two filter holders, one
for each detector channel. Refer to Figure 6 for a detailed diagram of the Filter Housing. One or
more filters can be used in each filter holder, depending on the application and the width of the
filter. During typical operation two filters are used: one laser filter and one emission filter. The
laser filter prevents scattered laser light from passing into the detector. The emission filter is a
band pass filter that allows only the fluorescence signal at a selected wavelength to pass into the
detector.
Beckman Coulter supplies the following filters:
• 520 nm, 560 nm and 675 nm emission
• 488 nm laser filter (notch filter)
Depending on the application and laser, you may use any standard 0.5 inch diameter optical filter
in the range of 350 to 750 nm.
To install filter(s) into the filter holder (refer to Figure 6):
1
Hold the filter housing in the same orientation as shown in the drawing.
2
Remove the beam blocker if present.
3
4
5
PN 718113AF
Hold the filter with the arrow on the outside edge of the filter pointing up.
(If the filter does not have an arrow on its edge, refer to the note below). Be sure to handle filters
by the edges.
Carefully place the filter into the filter holder.
When all filters are in the filter holder, insert the spring and install the filter holder in the
appropriate location (channel 1 or 2) in the filter housing.
11
Laser Induced Fluorescence Detection
Installation
6
If the filter(s) are removed from a channel, re-install the beam blocker in its place to protect the
photomultiplier tube.
NOTE If there is no arrow on the edge of the filter you are using, look at both sides of the filter and
determine which side has the more reflective surface. (Typically the more reflective side also has a
wide edge rim that extends beyond the filter surface). The filter should be installed with the more
reflective side facing the light source (the laser). In the LIF detector, laser light comes from the center
of the filter housing. So if you are holding the housing in the proper orientation, install a filter with
the arrow and/or reflective side with the wider rim pointing up (toward the filter housing).
If a filter is installed incorrectly, it will work but its performance may not be optimal.
Figure 6 Installing Filters in the Filter Housing
1. Laser Filter
2. Emission Filter
12
3. Beam Blocker — use when
filters are not installed
PN 718113AF
Laser Induced Fluorescence Detection
Installation
Installing the Filter Housing into the Detector
Insert the filter housing into the opening in the right side of the detector. Refer to Figure 7 for more
information. Make sure the “keyed” corner of the filter housing lines up with the “keyed” corner of
the Detector Module. The housing will fit into the opening in this orientation only, so it cannot be
installed incorrectly.
Figure 7 Installing the Filter housing into the LIF Detector
PWP
UV
HV +
HV -
900709L.AI
PN 718113AF
13
Laser Induced Fluorescence Detection
Installation
Installing the LIF Detector into the Instrument
WARNING
Be sure to power down the instrument before proceeding with component
installation.
Hold the LIF Detector level and place it into the instrument, as shown in Figure 7, keeping the two
female connectors on the LIF Detector level to the two male connectors located on the instrument.
Secure the Detector Module in place by fastening the captive screws to finger tightness.
Preparing the Cartridge for LIF Usage
Build the cartridge as described in the Installation and Maintenance Manual, up to the point when
the aperture plug is installed. The LIF Detector uses a special plug, which is not interchangeable
with those used on the UV/PDA system.
To install the LIF plug and probe stabilizer (see Figure 8):
14
1
Carefully install the metal LIF plug from the back of the cartridge.
2
Snap on the probe stabilizer such that the lock pins snap into the dimples on the plug.
PN 718113AF
Laser Induced Fluorescence Detection
Installation
Figure 8 Installing the LIF Plug and Probe Stabilizer
1
2
900808L.AI
1. LIF Plug
2. Probe Stabilizer
Install the cartridge containing an LIF plug into the instrument. Refer to section 3 of the Installation
and Maintenance Manual for more information on this procedure.
Connecting the Probe to the Cartridge
When connecting the probe to the LIF Cartridge, align the two pins on the left side of the probe to
the corresponding openings on the clamping bar. Squeeze the probe clamp to open the jaws on the
probe, and carefully install the probe onto the clamping bar. Refer to Figure 9 for more information
on this procedure.
NOTE When not in use, install the probe in the Probe Holder (see Figure 5) on the Interconnect Module.
This provides a mechanical protection for the probe and shields it from dust and other particles.
PN 718113AF
15
Laser Induced Fluorescence Detection
Installation
Figure 9 Connecting the Probe to the LIF Cartridge
1
PWP
UV
HV +
HV -
2
900706L.AI
1. Probe Stabilizer
2. Probe Clamp
16
PN 718113AF
Laser Induced Fluorescence Detection
Operation
Operation
Preparation
WARNING
Make sure the laser fiber optic cable and interlock devices are connected to the
LIF Detector before turning on power to the instrument or the laser. If the
interlock is defeated, laser light could be accessible in the interior or emitted from
the fiber optic cable.
1
Follow the instructions described in the Installation section before proceeding with step 2.
2
Turn on the instrument.
3
Turn on the laser. After the laser lights, wait at least 15 minutes for the laser output to stabilize.
NOTE For instructions on operating the instrument from 32 Karat software, see the
P/ACE MDQ User’s Guide.
PN 718113AF
17
Laser Induced Fluorescence Detection
Operation
Configuring 32 Karat for LIF Operation
1
The 32 Karat Enterprise screen is shown in Figure 10. Right-click in this screen to create a new
instrument. Right-click, then click New > Instrument.
Figure 10 Main Menu
18
PN 718113AF
Laser Induced Fluorescence Detection
Operation
2
Name the new instrument. Right-click the newly created instrument to configure, then click
Configure > Instrument . . . See Figure 11 and Figure 12.
Figure 11 Configure Instrument menu command
Figure 12 Choosing the Type of Instrument
PN 718113AF
19
Laser Induced Fluorescence Detection
Operation
3
Choose the type of instrument you want to control, P/ACE MDQ CE or ProteomeLab PA 800.
A warning notice appears stating that changing the instrument type will erase ALL device
settings. Since this is a new instrument configuration and there is no data to lose, choose OK to
continue. Then click Configure.
Figure 13 Confirmation
There are two options for configuring an instrument, manual or auto configure. Manual
configuration enables the user to customize the instrument configuration. Auto Configuration
will detect the type of detector installed and then scan the trays to determine what is installed.
The instrument needs to be powered on with the desired trays installed for Auto Configure to
work.
4
Double-click on the LIF Detector on the right side of P/ACE MDQ CE Configuration Screen.
See Figure 14.
Figure 14 Choosing the LIF Detector
20
PN 718113AF
Laser Induced Fluorescence Detection
Operation
The P/ACE System MDQ Instrument Configuration screen allows the user to define the types of
trays installed, define the home position of each tray, identify the firmware version and access
the LIF Calibration Wizard.
Figure 15 Configuring the LIF Detector
5
PN 718113AF
Choose OK to accept all the parameters set up in the configuration.
21
Laser Induced Fluorescence Detection
Operation
Direct Control
Figure 16 shows the Direct Control screen for instruments configured with an LIF Detector.
Figure 16 Direct Control Screen
1
Clicking the laser symbol on the Direct Control screen brings up the Laser Control dialog box,
shown in Figure 17. Select ON to indicate that the lasers are on.
NOTE The lasers cannot be controlled individually.
Figure 17 Laser Control Screen
Laser Control
The lasers can be controlled from Direct Control or by adding the ‘Laser ON’ or ‘Laser OFF’ event to
the time program section of a method. Both lasers are switched simultaneously and cannot be
controlled individually.
The laser control is a software-controlled on/off switch which enables or disables the
laser interlock. The laser has to be physically powered on for this control to be functional. The
22
PN 718113AF
Laser Induced Fluorescence Detection
Operation
status on the Direct Control and Status screen reflects the position of this on/off switch and not the
state of the laser.
Time Program
When programming a method with LIF Detection, select Method > Instrument Setup.
The instrument setup window will appear. See Figure 18.
Figure 18 LIF Detector Initial Conditions Screen
NOTE Excitation and Emission Wavelength settings are for indication purposes only. The excitation and
emission wavelengths are determined by the laser and filter combination installed in the LIF detector.
Dynamic range: A Dynamic range of 1.0 through 1000 RFU can be selected.
Dynamic Range
In the IEEE Standard Dictionary of Electrical and Electronics Terms, the dynamic range is defined as
“The range of output levels that can be read, from saturation level to the level of minimum
discernible output signal.” For the LIF detector, the upper limit of the dynamic range corresponds
to the maximum output signal from the detector (the highest RFU value detectable). If a dynamic
range is selected which is lower than the largest peak, peak tops will be truncated and flattened
(see Figure 19).
PN 718113AF
23
Laser Induced Fluorescence Detection
Operation
Figure 19 Electropherograms (A, B) with different Dynamic Ranges
A. Electropherogram with Dynamic Range set to 100.
B. Same Electropherogram with Dynamic Range set to 10. Note that the heights of all
peaks have exceeded the dynamic range setting and were truncated.
For optimal results, select a dynamic range slightly larger than the tallest peak in the
electropherogram.
NOTE The higher the dynamic range, the higher the relative noise level in the electropherogram. This effect
is not significant at dynamic range settings of ≤ 100, but is clearly visible at a dynamic range setting of
1000. For optimal sensitivity, use a dynamic range setting of ≤ 100, even if this would involve dilution of
the sample prior to injection.
Calibration Correction Factor
Unlike absorbance detectors, there is no absolute reference point for fluorescence detectors;
measurements are reported relative to a defined “standard” in relative fluorescence units (RFU).
This measurement is dependent on a number of parameters including but not limited to:
• Capillary internal diameter
• Concentration of the fluorescent species
24
PN 718113AF
Laser Induced Fluorescence Detection
Operation
• Fluorescence yield of the molecule being measured
• Background buffer composition and properties
• Separation parameters (temperature, voltage, etc.)
• Laser power
To minimize variation caused by (small) changes to any of the parameters listed above, a correction
factor can be used to normalize the detector response against a defined standard.
The Calibration Correction Factor (CCF) is the mathematical relationship between the fluorescence
from a known concentration of the analyte and the associated signal detected by the instrument.
Subsequent measurements are multiplied by the factor to determine the relative fluorescence unit.
For the LIF Detector system, a Calibration Wizard is available to simplify the determination of the
calibration correction factor. During the CCF determination, the Calibration Wizard instructs the
instrument to execute the following:
• Measure the background (with buffer)
• Measure the signal from the “standard”
The Calibration Wizard will then:
• Calculate the change in signal between the standard and the background buffer
• Calculate the correction factor using the following equation:
Target RFU Value
CCF = ------------------------------------------------------ • CCF O
Measured RFU Value
where:
Target RFU value = Target value for the standard solution used (entered by user into the Wizard).
Measured RFU value = Change in signal between background buffer and standard.
CCFo = The current value of the Calibration Correction Factor (CCF).
PN 718113AF
25
Laser Induced Fluorescence Detection
Operation
Once the CCF value is calculated and accepted by the user, all subsequent measurements will be
multiplied by this value.
As long as run conditions, capillary I.D. and chemistries remain unchanged, the CCF calculated
should remain valid. It is recommended that the standard solution be measured (as a check)
periodically or when a new capillary is installed.
NOTE The Calibration Correction Factor determined in this process will affect all subsequent analysis.
CAUTION
The LIF System must be installed and lasers must be warmed up according to the
laser manufacturer’s instructions before running the Calibration Wizard.
Calibration Wizard
To access the Calibration Wizard
26
1
Right-click on the LIF instrument from the 32 Karat home screen.
2
Choose Configure > Instrument and click the Configure button.
3
Double-click on the LIF Detector icon in the Configured modules window.
PN 718113AF
Laser Induced Fluorescence Detection
Operation
4
Click on the LIF Calibration Wizard. See Figure 20.
Figure 20 Accessing the LIF Calibration Wizard
1. LIF Calibration Wizard button
Calibration Wizard – Step 1
After starting the Calibration Wizard, the Calibration Wizard – Step 1 screen is displayed as shown
in Figure 21. The following options are presented:
• Auto
• Manual
PN 718113AF
27
Laser Induced Fluorescence Detection
Operation
Figure 21 Calibration Wizard – Step 1
Selecting Auto Mode will guide the user through a series of steps that will automatically determine
the appropriate value for the calibration correction factor (CCF).
Select Auto Mode, and click the Next button. The Calibration Wizard - Step 2 screen appears,
as shown in Figure 22.
NOTE Manual Calibration is discussed in the section Manual Mode.
Calibration Wizard – Step 2
1
Enter the following calibration parameters: (See Figure 22.)
• Detector Channel 1 or 2 (note that the Calibration Wizard must be run separately for each
channel)
• Target RFU Value (the value expected for the standard)
• Capillary Dimensions – Internal Diameter (in mm), and Total Length (in cm)
28
PN 718113AF
Laser Induced Fluorescence Detection
Operation
2
Click Next.
Figure 22 Calibration Wizard – Step 2
PN 718113AF
29
Laser Induced Fluorescence Detection
Operation
Calibration Wizard – Step 3
The following Calibration Wizard – Step 3 screen appears, as shown in Figure 23.
1
Load the buffer and calibration mix as shown in Figure 23.
Figure 23 Calibration Wizard – Step 3
NOTE The Buffer and Calibration mixture must be appropriate for the analysis to be run.
It is recommended to use 2.0 ml buffer vials with red caps for this procedure.
30
PN 718113AF
Laser Induced Fluorescence Detection
Operation
2
After installing the vials in the tray, close the instrument lid and click Next.
The screen shown in Figure 24 is displayed while the calibration is running. Please wait until
the instrument has completed its calibration, which may take several minutes.
WARNING
DO NOT open the instrument doors during this step.
Figure 24 Calibration Wizard Running Screen
Calibration Wizard – Step 4
When the Calibration is completed, the calculated value (or CCF) for the channel selected is
displayed. Clicking Accept will cause this value to be used during subsequent analysis. If Cancel is
selected, the previously stored value will be retained.
Figure 25 Calibration Wizard – Step 4 Screen
PN 718113AF
31
Laser Induced Fluorescence Detection
Care and Maintenance
Manual Mode
The Manual Mode allows the user to enter values for the Calibration Correction Factor manually.
When Manual Mode is selected in Step 1 (see Figure 21), the screen shown in Figure 26 is displayed.
Enter the desired CCF values, and click Accept. These values will be used for all subsequent analysis.
NOTE Running the Calibration Wizard in the Auto Mode is preferred for optimum performance.
Figure 26 Calibration Wizard – Manual Mode
Care and Maintenance
Introduction
WARNING
Any maintenance procedure requiring removal of an instrument panel exposes the
operator to the possibility of electrical shock and/or mechanical injury. Such
service procedures should only be done by trained, qualified personnel.
The Beckman Coulter 488 nm and 635 nm laser modules operate at high voltages
and emits laser light that can cause serious damage to the eyes. Servicing of the
laser should be done only by a Beckman Coulter Field Service Representative.
Inspecting the System
The LIF detector system is designed to prevent laser light exposure outside the laser box, fiber
cable, and detector. To ensure continued laser light containment, regularly check the following
parts of the system.
• Visually inspect the full length of the fiber cable to make sure it is in good condition.
• Visually inspect the laser module housing to verify that no panels are loose, which could
provide access to laser energy inside the module.
• Verify operation of the interlock. If the interlock is defeated, potentially harmful laser power
of up to 3mW could be accessible in the interior or could be emitted from the fiber.
32
PN 718113AF
Laser Induced Fluorescence Detection
Care and Maintenance
Cleaning
Clean the exterior surfaces of the detector and laser module regularly by wiping with a clean, damp
cloth. If necessary, a mild detergent can be used; finish by wiping with a soft, dry cloth.
The filters are delicate optical components that must be protected from dirt, dust, and fingerprint
contamination. Once installed in the filter housing, they are protected from contamination and
normally do not require cleaning. Do NOT clean a filter unless it is dirty enough to affect system
performance, due to the risk of damaging the filter during the cleaning process.
Storage
When not in use, install the probe in the Probe Holder on the Interconnect Module. This provides a
mechanical protection for the probe and shields it from dust and other particles.
PN 718113AF
33
www.beckmancoulter.com
© 2014 Beckman Coulter, Inc.
All Rights Reserved
© Copyright 2026 ExpyDoc